• よくある質問と答え (Frequently Asked Questions and Answer)

    MPDで楽曲再生中にsshログインが拒否されることがある
    SSH login failed when you play music in MPD


    ProcessCutdown でextremeを指定した場合が想定されます。

    どうしても楽曲再生中にssh接続を維持したい場合は、
    再生前に接続しておき、接続状態を継続することをお勧めします。
    (ただし、この場合はextreme本来再生品質にはなりません。)

    These issue will occur when you enable "extreme" setting in ProcessCutDown (at NETWORK).
    If you want to keep the SSH shell connection when songs playback,
    connect to RaspberryPi in SSH before play song.
    (But, in this case, song playback quality do not achieve ideal "extreme" quality.)

  • MPDで楽曲再生中に"smpd.local"へのアクセスが拒否される
    Denied access to "smpd.local" when you play music in MPD


    [こちら](#A13)で説明の通り、ProcessCutdownでextreme指定した場合が想定されます。 また、未再生状態でもWebブラウザの場所に"smpd.local"を入力しても接続出来ない事象は、 以下の環境で発生する可能性があります。
    This issue will occur when you enable "extreme" settings in ProcessCutDown (at NETWORK). And theese environment will be occur this issue, if you don't play song.
    • Android上での各種ブラウザ(mDNSに非対応のため)
      WebBrowser in Android OS (don't support mDNS)
  • 不具合が発生したが、WebUIのsupportプラグインも使えなかったのでログを送れない
    I have trouble with symphonic-mpd, but I can't download support_log.tar.gz because of failue with WebUI


    sshで本体にログインして
    /opt/plugins/91-support/run.sh
    

    を実行し

    /var/lib/mpd/music/RAM/support_log.tar.gz
    

    を取得してサポートにお送り下さい。
    (RaspberryPiからのファイルダウンロードにはFTPクライアントのFilezillaが直感的に使いやすいのでお勧めします。)

    Login to your RaspberryPi via ssh and run /opt/plugins/91-support/run.sh.
    Then download support_log.tar.gz (in /var/lib/mpd/music/RAM) file and send it to support mail address.

  • DASHBOARDのAlertに「Under Voltage」他エラーが表示された
    "Under Voltage" was shown in Alert row of DASHBOARD plug-in


    起動途中、もしくは現在もRaspberryPiで何らかのエラーが記録されたためです。 電圧低下・温度超過のアラートは、以下のコマンドで現在値を確認できます。
    Because, Error reporting/reported in boot prosess with your RaspberryPi. You can check the under votage and over-temp alert with below command. `vcgencmd get_throttled`

    電圧低下が記録された場合の出力例)
    If your RaspberryPi reported undervoltage
    throttled=0x50000

    5桁目は1回以上発生したかどうか
    1桁目は現在発生しているかどうか
    を表しています。
    in the 5th column is not 0, allerts was occured at least one times,
    in the 1th column is not 0, allerts is getting now.

    値(val) 電圧低下(underVoltage) temp_limit超過(temp_limit) CPU制限(CPUlimit) 85℃超過(overTemp85℃)
    1 ●
    2 ●
    3 ● ●
    4 ●
    5 ● ●
    6 ● ●
    7 ● ● ●
    8 ●
    9 ● ●
    a ● ●
    b ● ● ●
    c ● ●
    d ● ● ●
    e ● ● ●
    f ● ● ● ●

    上記の例(throttled=0x50000)は、5桁目が5なので、電圧低下とそれに伴うCPU制限が1回以上記録されたということを表しています。
    1桁目は0なので、今は何もアラートが発生していないということになります。
    In this case(throttled=0x50000), 5th column value is 5, undervoltage and CPU throttled was occured at least one time (and they have not been continue).

    万が一85℃超過が発生していた場合、ダッシュボード上ではアラート無しとして表示されてしまいます。これは85℃超過が発生するケースを考慮していないためです。火傷しそうなほど熱いのにアラート無しで表示される場合は、vcgencmd get_throttledで確認してみてください。


    With this distribution, we does n't except about OverTemp85℃, so OverTemp can't show in Dashboard ( If happend).
    If you touch the Raspberry Pi4 board and feel almost burned, you have to check the overtemp with vcgencmd get_throttled.

  • Terra-Berry DAC2のセットアップ
    *Setting for Terra-Berry DAC2


    1. config.txtでシリアル接続を有効にしてください。(enable_uartの行とinit_uart_clockの行をコメントアウト)

    2. sshで接続し、プラグインをインストールしてください。

    app install pyserial
    app install terraberry
    
    1. Web UIからTerra-Berry DAC向けに設定変更してください。
    設定画面 設定項目 設定値
    SOUND CARD dtoverlay hifiberry-dac
    MPD mixer_type hardware
    DSD Mode dop
    TERRA-BERRY DAC2 Digital Filter 0: Sharp roll-off
    1: Slow roll-off
    2: Short delay Sharp roll-off (default)
    3: Short delay Slow roll-off
    Sound Mode 1: Sound Setting 1 (default)
    2: Sound Setting 2
    3: Sound Setting 3
    SRC/DAC Mode auto: Auto Detect (default)
    pcm: PCM in PCM out
    dsd: DSD in DSD out (DoP ON)
    pcmdsd: PCM in DSD out (DoP OFF)
    dsdpcm: DSD in PCM out (DoP ON)
    Max Volume -128 ~ 0
    Volume Range 0 ~ 128

    Terra-Berry DAC2のデジタルアッテネータは、-128dB~0dBの範囲でボリュームを絞ることができます。(内部的には0.5dB幅の256段階でコントロールしています。)

    例えば、Volume Range=128、Max Volume = 0と設定すると、mpdのボリュームが0の時に最小音量の-128dB、ボリュームが100の時に最大音量の0dBとなります。

    例えば、Volume Range=50、Max Volume = -12と設定すると、mpdのボリュームが0の時に最小音量の-62dB、ボリュームが100の時に最大音量の-12dBとなります。

    説明を書きながら、、、MinとMaxを指定する方が直感的で分かり易いかもしれないと思いはじめました。例えば、Min=-62、Max=-12のような感じです。

  • UPnPを使いたい
    I want to use UPnP support application


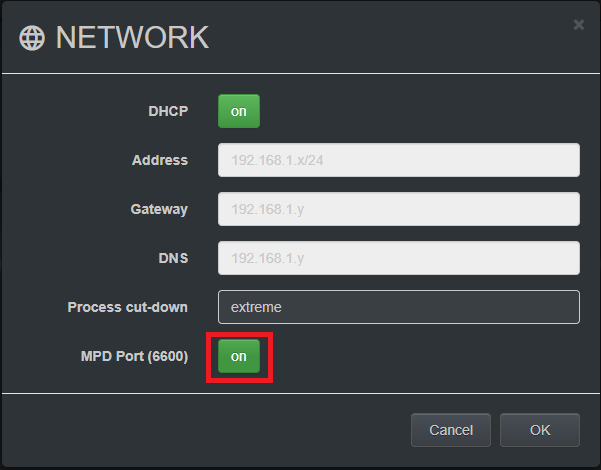
    1) Web UIのNETWORK設定を開き、MPD Port(6600)を有効化(Activate port 6600)
    1. upmpdcli関連ライブラリ群のインストール(Install the upmpdcli related libraries.)
    app install upnp
    
    1. 再起動(reboot)
  • RoonBridgeを使いたい
    I want to use RoonBridge


    1. RoonBridge 関連ライブラリのインストール(Install the RoonBridge related libraries.)
    app install roonbridge
    
    1. 再起動(reboot)
  • WebUI以外のMPDクライアントを使いたい
    I want to use another mpd client


    TCP 6600 ポートを開ける必要があります。
    You have to activate TCP port 6600.

    1. 6600ポートを有効化(Activate port 6600)
      Web UIのNETWORK設定を開き、MPD Port (6600) をONにしてOKボタンをクリックします。
      mpd_port.png
  • SB32+PRO DoPのコマンド送信


    v1,0以降のSMPDではsudoを使わないことと、/etc/modulesの位置が変わったことから、
    https://nw-electric.way-nifty.com/blog/sb32pro_com.html
    に記載されているコマンドを送信できなくなっています。
    以下、対処方法です。

    ①

    nano /etc/modules-load.d/modules.conf
    

    で #i2c-dev を i2c-dev に書き換える。
    この方法の場合、②とは異なり、一度書き換えればいつでもコマンドを送信できます。しかしながら、好みの設定が固まったら②の方法が良いと思われます。

    ② パパリウス さんからの情報です。

    modprobe i2c-dev
    

    で一時的にi2c-devモジュールを読み込むことができます。

    上記、いずれの場合も
    https://nw-electric.way-nifty.com/blog/sb32pro_com.html
    に記載されているコマンドのsudoを除いて送信してください。

  • EEPROMファームウェアの更新
    Update Raspberry Pi 4 boot EEPROM


    symphonic-mpdでは以下のバージョンを推奨しています。
    We recommend the following firmware version.


    BOOTLOADER:
    Tue 10 Sep 10:41:50 UTC 2019 (1568112110)
    
    VL805:
    000137AD 
    

    推奨バージョンのファームウェアはSDイメージの/opt/rpi-eepromに格納してあります。
    These firmware is stored in / opt / rpi-eeprom of the SD image.

    新しいRaspberry Pi4を購入したら、念のためにファームウェアのバージョンをご確認してください。
    If you bought the new Raspberry Pi board, please check the firmware version just in case.

    <ファームウェアのバージョン確認 check the firmware version>
    cd /opt/rpi-eeprom
    git checkout .
    ./rpi-eeprom-update
    
    <出力例 output sample>
    BCM2711 detected
    BOOTLOADER: up-to-date
    CURRENT: Tue 10 Sep 10:41:50 UTC 2019 (1568112110)
     LATEST: Tue 10 Sep 10:41:50 UTC 2019 (1568112110)
     FW DIR: /opt/rpi-eeprom/firmware/critical
    VL805: up-to-date
    CURRENT: 000137ad
     LATEST: 000137ad
    

    推奨バージョンより古い場合は、以下のコマンドでアップデートしてください。
    If it is older than the recommended version, update it with the following command.

    <ファームウェアのアップデート firmware update command>
    ./rpi-eeprom-update -a
    

    もし推奨バージョンより新しい場合は、推奨バージョンに戻していただくこともご検討ください。
    If you are newer than the recommended version, please consider reverting to the recommended version.

    <推奨バージョンへの戻し firmware revert to recommended version>
    ./rpi-eeprom-update -f firmware/critical/pieeprom-2019-09-10.bin
    ./rpi-eeprom-update -u firmware/critical/vl805-000137ad.bin
    
  • SDカードイメージを作成したがブートしない(over_voltage編)
    *I'd made this SD card image, but it could not boot up(about over_voltage).


    **以下、A19まで「symphonic-mpdのSDカードイメージでブートしない」場合にについて記述します。** **The following describes the case of "Do not boot with symphonic-mpd SD card image" up to A19.**

    なお、念の為RaspberryPi本体の不具合かどうかを確認するため、他のディストリがブートするかを確認してみてください(他のディストリがブートすれば、以下に示すとおりの原因だと推察されます)。
    In addition, just in case, in order to check if it is a malfunction of the Raspberry Pi main unit, please check whether other distributions boot (If other distributions boot, it is presumed that the cause is as shown below) .

    config.txtのover_voltageを調整してみてください。
    Try adjusting the over_voltage in config.txt.

    config.txtはSDカードイメージを作成するために使用したPCにイメージ作成済みSDカードを差込した際に表示されるドライブ内にあります。
    config.txt is in the drive that appears when you insert the imaged SD card into the PC used to create the SD card image.

    当該ファイルをエディタで編集してみてください。
    (当該パーティションはfat32形式でフォーマットされているため、Windows,Mac,Linux他ほぼ全てのOSでアクセス可能です。)
    Try editing the file with an editor.
    (Since the partition is formatted in fat32 format, it can be accessed by almost all OS such as Windows, Mac, Linux.)

    v1.0.7以降ではconfig.txtに規定値として over_voltage=1 と記載されていますが、これを0〜4の範囲で変化させて様子を見てください。
    In v1.0.7 or later, `` ʻover_voltage = 1``` is described as the default value in config.txt, but please change this in the range of 0 to 4 and see how it looks.

    なぜこの値を調整する必要があるのか?
    Why you have to adjust this value.

    RaspberryPiのSoC(CPU周り)の電圧を調整する機能としてover_voltageがあります。
    symphonic-mpdでは通常のディストリとは異なりRaspberryPiのクロックを
    固定で運用させているため、この値を調整しないとブートしないことがあります。
    There is over_voltage as a function to adjust the voltage of SoC (around CPU) of Raspberry Pi.
    In symphonic-mpd, unlike a normal distribution, the clock of Raspberry Pi is used.
    Since it is operated fixedly, it may not boot unless this value is adjusted.

  • SDカードイメージを作成したがブートしない(config.txtの記述チェック編)
    * I'd made this SD card image, but it could not boot up(check your config.txt).*


    config.txtを手動で編集した箇所はありますか?
    例えば dtoverlay=rpi-dac の行など。
    Is there any part where you manually edited config.txt?
    For example, the line dtoverlay = rpi-dac.

    dtoverlayで始まる行は、行頭以外にコメント#を含んだ場合は正常にconfig.txtを解析出来ずブートしないことがあります。
    Lines starting with dtoverlay may not parse config.txt normally and may not boot if the comment # is included in addition to the beginning of the line.

    dtoverlay=hifiberry-digi-pro #rpi-dac のような書き方をしていると起動しませんので、
    修正してから再度起動の確認をしてみてください。
    If you write something like dtoverlay = hifiberry-digi-pro # rpi-dac, it will not start, so Please correct it and check the startup again.

  • SDカードイメージを作成したがブートしない(クロック設定編)
    I'd made this SD card image, but it could not boot up(about clock setting).


    config.txtの下記の行を全てコメントアウトしてみてください。
    Try commenting out all the lines below in config.txt.

    # CLOCK
    force_turbo=1
    arm_freq=1188
    core_freq=594
    core_freq_min=594
    sdram_freq=594
    sdram_freq_min=594
    gpu_freq=1
    gpu_freq_min=1
    

    クロック設定が原因ならこれで起動してくれるかもしれません。
    If the clock setting is the cause, this may start it.

    symphonic-mpdでは上記の設定でクロックを固定運用しているため、RaspberryPiの個体によっては上記設定に対応出来ず起動しないことが稀にあります。
    In symphonic-mpd, the clock is fixedly operated with the above settings, so depending on the individual Raspberry Pi, the above settings may not be supported and it may not start.

  • SDカードイメージを作成したがブートしない(PLL設定編)
    I'd made this SD card image, but it could not boot up(about PLL setting).


    config.txtと同じディレクトリにある dt-blob.bin をリネームしてみてください。
    例えばdt-blob.bin.bakなど。
    Try renaming dt-blob.bin in the same directory as config.txt.
    For example, dt-blob.bin.bak.

    PLL設定が原因ならこれで起動すると思われます。
    This will probably start if the PLL settings are the cause.

  • SDカードイメージを作成したがブートしない(SDカード本体編)
    I'd made this SD card image, but it could not boot up(about TF/micro SD card).*


    イメージ作成に使用するSDカードを別メーカのものに変更したことによりブート出来たという報告もありますので、 お試ししてみることもおすすめします。

    There is also a report that it was possible to boot by changing the SD card used for image creation to that of another manufacturer.
    We also recommend that you give it a try.

  • Wifiは使用できるのか
    Can we use Wifi in this distribution?


    結論として、Xenomaiカーネルを備えたRaspberry Pi4(当ディストリビューション)でWifiを使用することにまだ成功していません。
    おそらく、Wifi関連のドライバーソースのいくつかを修正する必要があります。
    symphonic-mpdでwifiを使用するには、次の対策が必要です。

    • カーネルモジュール(brcmfmac、cfg80211、rfkill、brcmutil)を追加
    • ファームウェアをインストール(例:brcmfmac43455-sdio.bin)
    • libnlのインストール
    • wpa_supplicant(wpa_supplicant.conf)のインストールと構成
    • Systemdのネットワーク構成(/etc/network/wlan0.network)
    • Systemd自動起動構成(/lib/systemd/system/wpa_supplicant.service)
    • config.txtでのWifi有効化(dtoverlay = disable-wifiをコメントアウト)

    これにより、wifiに接続できますが、しばらくするとネットワークがハングアップします。
    この問題の正確な原因はわかりません。
    Wifi関連のドライバーはXenomaiと互換性がない可能性が非常に高いです。 カーネルソースを修正することで問題が解決するかどうかはわかりません。

    In conclusion, I have not yet had any success using Wifi on the Raspberry Pi 4 with the Xenomai Kernel.

    Perhaps I need to fix some of the Wifi-related driver sources.
    In order to use wifi with symphonic-mpd, the following measures are necessary.

    • Add a kernel module (brcmfmac, cfg80211, rfkill, brcmutil).
    • Install the firmware (e.g. brcmfmac43455-sdio.bin)
    • Installing libnl
    • Installation and configuration of wpa_supplicant(wpa_supplicant.conf)
    • Systemd's network configuration(/etc/network/wlan0.network)
    • Systemd auto-start configuration(/lib/systemd/system/wpa_supplicant.service)
    • Wifi enabled in config.txt (comment out dtoverlay=disable-wifi)

    If you setup these settings you can access to WiFi, but network hangs up later.
    I don't know the exact cause of this problem.

    It is very likely that the Wifi-related drivers are not compatible with Xenomai. I don't know if fixing the kernel source will solve the problem or not.

  • Pi4のメモリ制限について
    About Pi4 model and memory Limit


    本来は予約している @パパリウス さまに記載いただく予定でしたが、
    念の為設定方法だけ記載します。
    (なぜメインメモリ容量を制限しないとならないかは追って記載)

    /boot/cofig.txtにこのパラメーターを追記することにより、Raspberry Pi 4Bが使用するRAMの合計量(メガバイト単位)を指定します。

    total_mem=2048
    

    なお、現状のSDカードイメージでは既に2GBに制限されていますので、通常は変更する必要は無いと思われます。
    (1GBモデルでtotal_mem=2048と記載の場合どういう挙動をするかは不明)

    If you write below parameter in /boot/config.txt, you can limit the RAM usage of your Raspberry Pi 4B board.

    total_mem=2048
    

    Current SD card image has this setting, so you don't have to write it.

  • Windows10/11 で smpd.local へアクセス出来ない場合
    Can we use smpd.local URL via Windows10/11


    Windows10/11 をお使いでブラウザの場所欄に http://smpd.local と入力しても、エラーになってwebuiが表示されない場合は以下の通り操作してみて下さい。

    1. こちらにある通り、Windows ファイアーウォールの設定でUDPの5353ポートが閉じられている場合がありますので、これを許可します。

    2. 前項の操作でも正常に動作しない場合、WiFi環境下だと smpd サーバからの応答パケットが欠落する場合があります。
      可能であれば有線LAN環境で接続して使用してみて下さい。

    3. これでも上手く行かない場合は、他のOSのアプリケーションを活用するなどの方法で smpd サーバのIPアドレスを調べる(そのままDHCP環境で使用する場合)か、
      smpd サーバに固定IPアドレスを付与して運用して下さい。

    なお、Apple 社製品類やLinux などのOSでAvahi 関連がきちんとインストールされている場合はこのような現象は発生しません。

    If you are using Windows10/11 and you can't access to http://smpd.local, please try these settings.

    1. you have to setup the windows firewall setting to enable udp 5353 port.
    2. If you change the windows firewall setting below but doesn't work well, try the wired ethernet connection (WiFi environment cause mDNS repley losts).
    3. If your environment does not work well, please use with static IP address.
  • Android スマホ・タブレットで smpd.local にアクセスできない
    Can't access to smpd.local via Android Smartphone, tablet


    smpd.local のホスト名→IPアドレス変換はmDNSという技術を使用しているのですが、本技術は Android には対応していません。
    Android のサードパーティアプリで smpd サーバの IP アドレスを調査する場合mDNS Discoveryというものを一応お勧めしておきます。
    当該アプリを開いてService Typeの欄に raop と入力し「Searchボタン」を押すと、************@I2S(*の部分は恐らくMACアドレス)という名前で smpd サーバが表示されます。

    In Android smartphones and tablets, mDNS not supported.