• よくある質問と答え (Frequently Asked Questions and Answer)

    The English version is here.

    Q. SDカードのパーティションを拡張したい。
    Q. SabreBerry32をマスターモードで使用したい。
    Q. SB32+PRO DoPの初期設定をしたい。
    Q. Terra-Berry DAC2のボリュームやデジタルフィルタを操作したい。
    Q. mpdのデータベースをバックアップしたい。
    Q. Web UIからボリューム操作をしたい。
    Q. Web UI以外のmpdクライアントを使いたい。
    Q. USBメモリを使いたい。
    Q. カバーアートを表示したい。
    Q. 固定IPアドレスを設定したい。
    Q. NASの接続先をIPv6アドレスで指定したい
    Q. 有線LANのLEDを消灯したい。
    Q. DSD再生(PCM変換)でノイズが聞こえる。
    Q. 再生した曲がキューから消えていく。
    Q. 曲が再生されない。動作が不安定。
    Q. Windows PCからRaspberry PiにSSHでリモートアクセスしたい
    Q. MacからRaspberry PiにSSHでリモートアクセスしたい
    Q. WindowsユーザーのためのSSHとの付き合い方
    Q. WindowsユーザーのためのSSHの基本:WindowsでSSHクライアント「PuTTy」を使用してsymphonic-mpdに接続する方法
    Q. WiFiを使用するには

    The English version


    Q. I want to extend the SD card partition.
    Q. I want to use Sabre Berry 32 in master mode.
    Q. I want to set the default settings for SB 32 + PRO DoP.
    Q. I want to work with Terra-Berry DAC2 volumes and digital filters.
    Q. I want to back up the database for mpd
    Q. I want to perform volume operations from the Web UI.
    Q. I want to use an mpd client other than the Web UI.
    Q. I want to use a USB flash drive.
    Q. I want to view cover art.
    Q. I want to set a static IP address.
    Q. I want to specify the NAS destination with an IPv6 address
    Q. I want to turn off the wired LAN LED.
    Q. I hear noise during DSD playback (PCM Conversion)
    Q. The song you played disappears from the queue.
    Q. The song does not play. The operation is unstable.
    Q. I want to remotely access the Raspberry Pi from a Windows PC via SSH
    Q. I want to remotely access the Raspberry Pi from a Mac via SSH
    Q. Introductions of SSH for Windows Users
    Q. SSH essentials for Windows : How to connect to symphonic-mpd using SSH client “PuTTy” on Windows
    Q. How to Enable WiFi on Raspberry Pi 3

  • SDカードのパーティションを拡張したい
    I want to extend the SD card partition


    sshログイン後、下記コマンドを実行して再起動してください。

    After ssh login, execute the command below and restart.

    sudo raspi-config noint --expand-rootfs
    sudo reboot
    

  • SabreBerry32をマスターモードで使用したい
    I want to use SabreBerry 32 in master mode


    (1) サウンドカードの設定 (Sound Card Set Up)


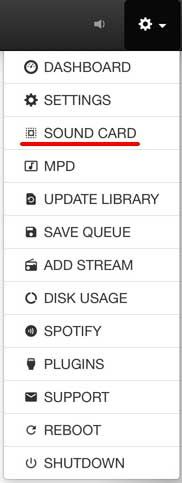
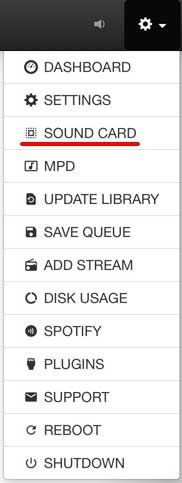
    WebUI右上の歯車アイコンをクリックしプルダウンメニューを表示させ、“SOUND CARD”を選択します。

    Click the gear icon in the upper right corner of the WebUI to display a pull-down menu, and select “SOUND CARD”

    PullDownMenu03_SoundCard.jpg

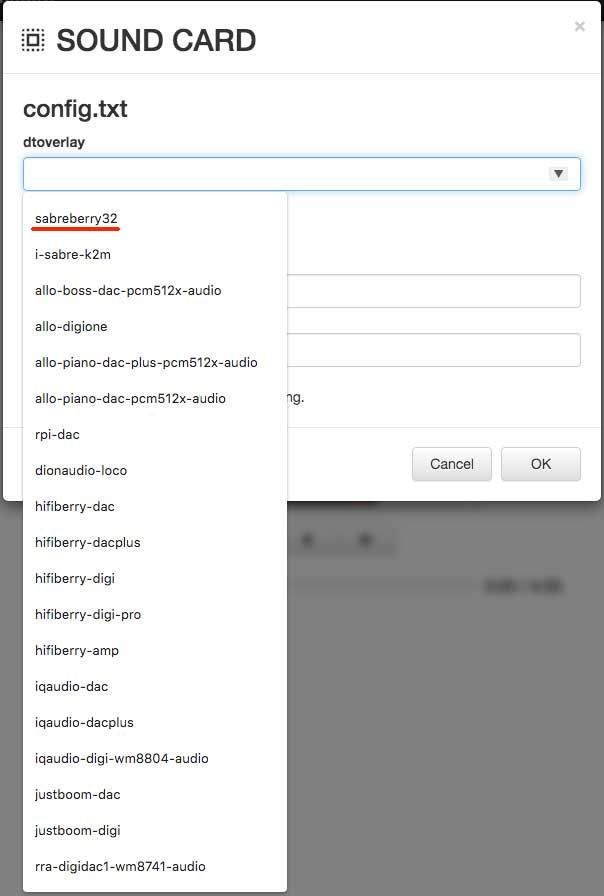
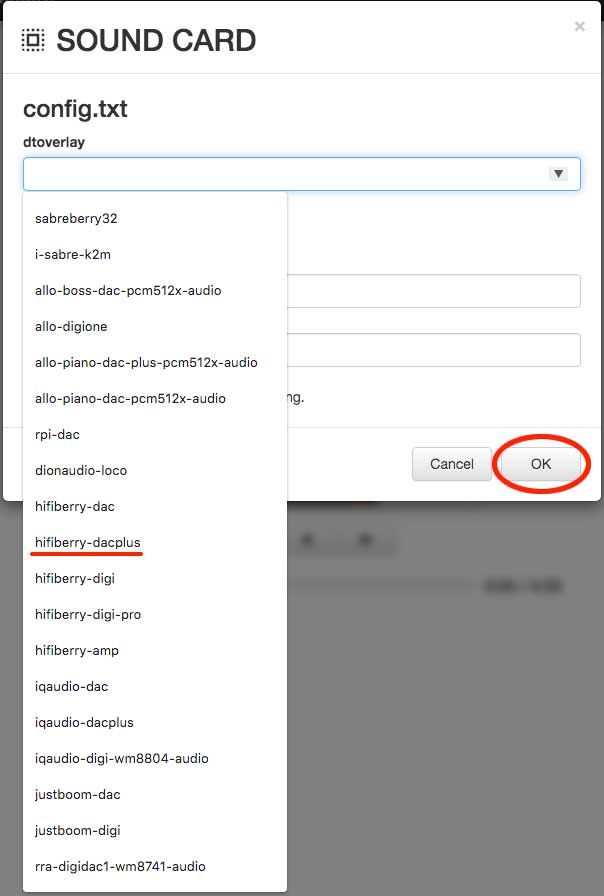
    表示されるSOUND CARDパネルの“dtoverlay”の入力欄に表示されるオプションメニューから“sabreberry32”を選択します。(オプションメニューは、dtoverlay入力欄を空欄にすることで表示されます)SabreBerry32をスレーブモードで動かしたい時は“sabreberry32,slave”と手入力してください。

    Select "sabreberry32" from the option menu displayed in the “dtoverlay” input field of the displayed SOUND CARD panel. (The option menu is displayed by leaving the dtoverlay input field blank.) If you want to run SaberBerry32 in slave mode, enter "sabreberry32,slave" manually.

    pannel03_SoundCard_pulldownmenu3.jpg

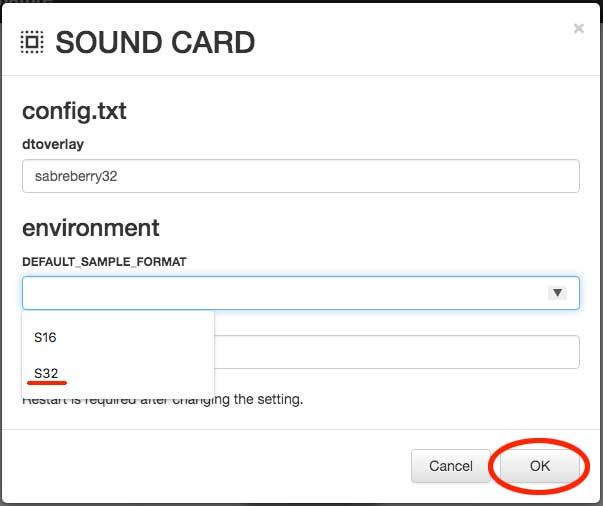
    “environment”の“DEFAULT_SAMPLE_FORMAT”で“S32”を選択します。SOUND CARDパネルの“OK”ボタンを押します。

    Select "S32" in "DEFAULT_SAMPLE_FORMAT" of "environment". Press the “OK” button on the SOUND CARD panel.

    pannel03_SoundCard_pulldownmenu4.jpg

    (2) MPDの設定 (MPD Set Up)


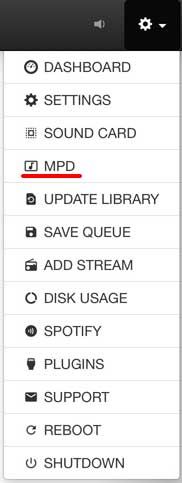
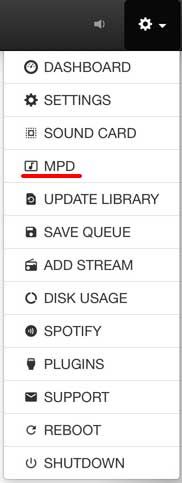
    WebUI右上の歯車アイコンをクリックしプルダウンメニューを表示させ、“MPD”を選択します。

    Click the gear icon in the upper right corner of the WebUI to display a pull-down menu, and select “MPD”.


    PullDownMenu04_MPD.jpg

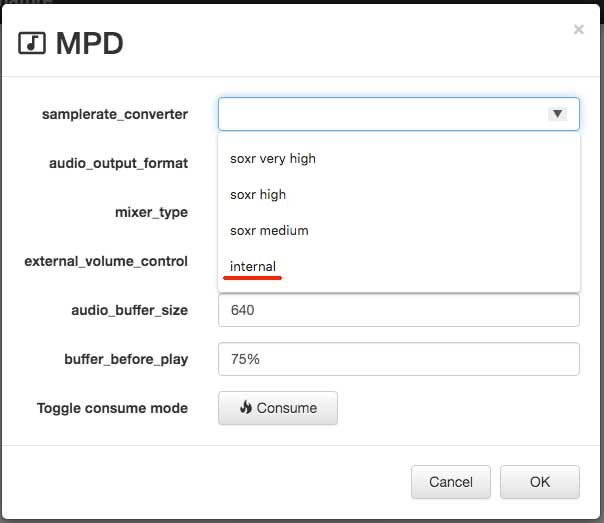
    “samplerate_converter”のオプションメニューから“internal”を選択します。

    Select “internal” from the option menu of “samplerate_converter”.


    pannel04_MPD_pulldownmenu1Red.jpg

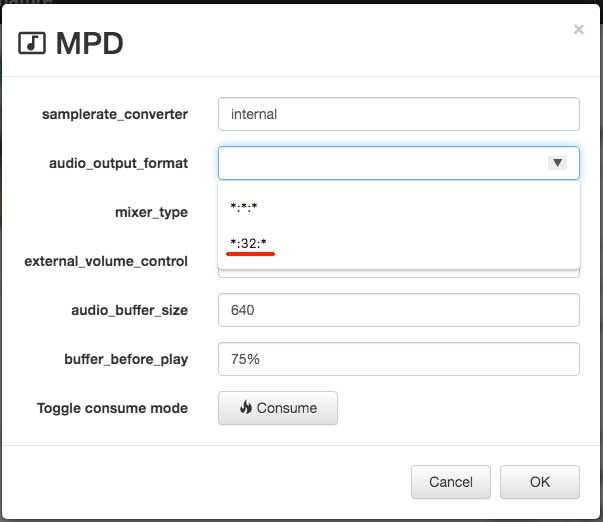
    “audio_output_format”のオプションメニューから*:32:*を選択します。

    Select *:32:* from the option menu of “audio_output_format”.

    pannel04_MPD_pulldownmenu2Red.jpg

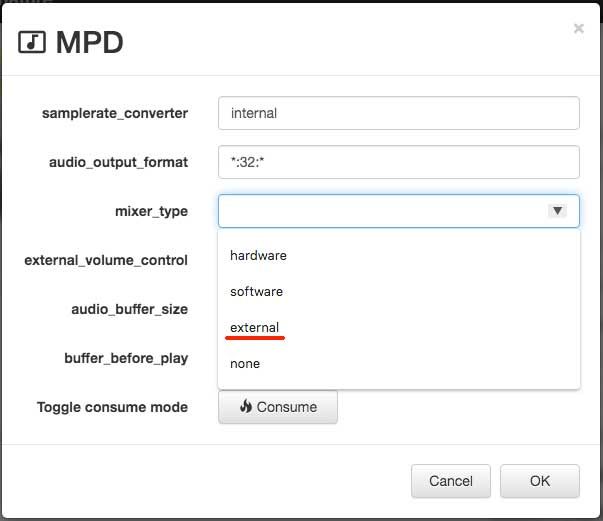
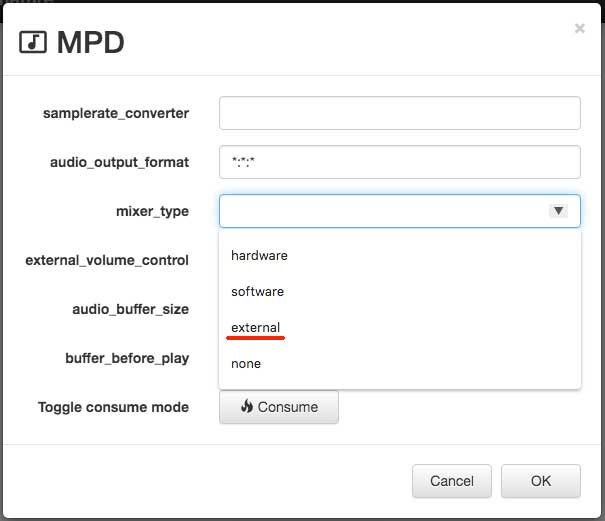
    “mixer_type”のオプションメニューから“external”を選択します。

    Select “external” from the “mixer_type” option menu.


    pannel04_MPD_pulldownmenu3Red.jpg


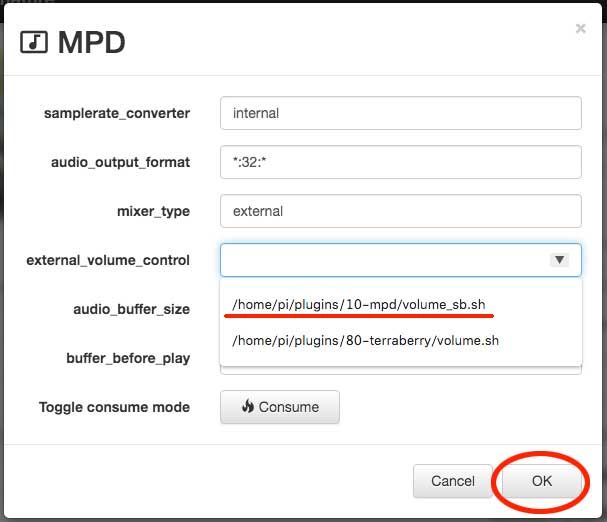
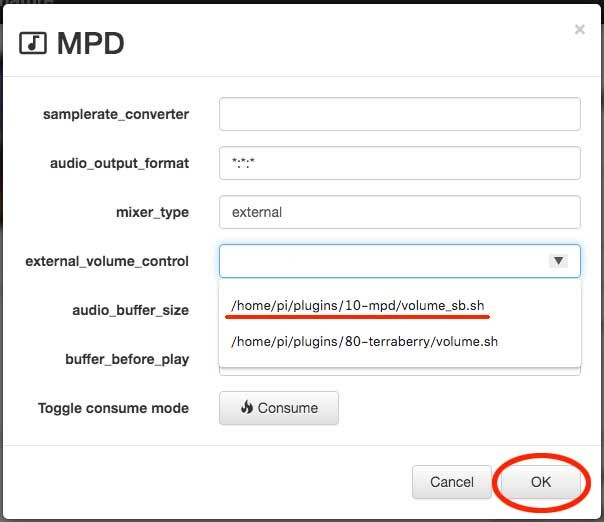
    “external_volume_control”のオプションメニューから“/home/pi/plugins/10-mpd/volume_sb.sh”を選択します。MPDパネルの“OK”ボタンを押します。

    Select “/home/pi/plugins/10-mpd/volume_sb.sh” from the option menu of “external_volume_control”. Press the “OK” button on the MPD panel.


    pannel04_MPD_pulldownmenu4Red.jpg

    最後にsymphonic-mpdを再起動させ、設定内容をシステムに反映させます。

    Finally, restart symphonic-mpd to reflect the settings to the system.

  • SB32+PRO DoPの初期設定をしたい
    I want to set up SB 32 + PRO DoP.


    (1) サウンドカードの設定 (Sound Card Set Up)


    WebUI右上の歯車アイコンをクリックしプルダウンメニューを表示させ、“SOUND CARD”を選択します。

    Click the gear icon in the upper right corner of the WebUI to display a pull-down menu, and select “SOUND CARD”.


    PullDownMenu03_SoundCard.jpg

    表示されるSOUND CARDパネルの“dtoverlay”の入力欄に表示されるオプションメニューから“hifiberry-dacplus”を選択します。(オプションメニューは、dtoverlay入力欄を空欄にすることで表示されます)SOUND CARDパネルの“OK”ボタンを押します。

    Select "hifiberry-dacplus" from the option menu displayed in the "dtoverlay" input field of the displayed SOUND CARD panel. (The option menu is displayed by leaving the dtoverlay input field blank.) Press the “OK” button on the SOUND CARD panel.


    pannel03_SoundCard_pulldownmenu5.jpg

    (2) MPDの設定 (MPD Set Up)


    WebUI右上の歯車アイコンをクリックしプルダウンメニューを表示させ、“MPD”を選択します。

    Click the gear icon in the upper right corner of the WebUI to display a pull-down menu, and select “MPD”.


    PullDownMenu04_MPD.jpg

    “mixer_type”のオプションメニューから“external”を選択します。

    Select “external” from the “mixer_type” option menu.


    pannel04_MPD_pulldownmenu3Red.jpg

    “external_volume_control”のオプションメニューから“/home/pi/plugins/10-mpd/volume_sb.sh”を選択します。MPDパネルの“OK”ボタンを押します。

    Select “/home/pi/plugins/10-mpd/volume_sb.sh” from the option menu of “external_volume_control”. Press the “OK” button on the MPD panel.


    pannel04_MPD_pulldownmenu5Red.jpg

    (3) /etc/modulesの編集 (Edit /etc/modules)


    symphonic-mpdにssh でアクセスし、以下のコマンドを実行します。

    Access the symphonic-mpd by ssh and execute the following command.

    sudo nano /etc/modules
    

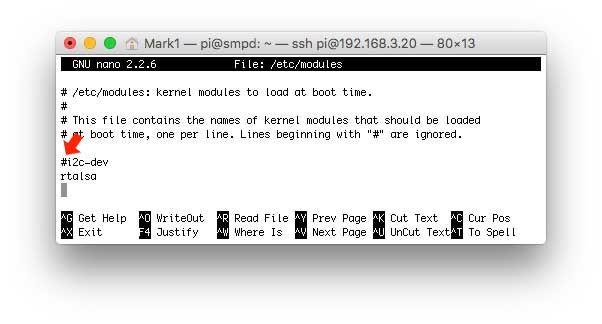
    開いた編集画面から「i2c-dev」を含む行を探し、行頭の「#」を削除します。

    Find the line that contains "i2c-dev" from the opened edit screen and delete the "#" at the beginning of the line.


    i2c-dev.jpg

    “CTRL”キーと“o”キーを押し、“enter”キーを押し、編集内容を保存します。“CTRL”キーと“x”キーを押し、編集画面を終了させます。

    Press the “CTRL” and “o” keys and press the “enter” key to save your edits. Press the “CTRL” key and “x” key to exit the edit screen.

    最後にsymphonic-mpdを再起動させ、設定内容をシステムに反映させます。

    Finally, restart symphonic-mpd to reflect the settings to the system.

  • Terra-Berry DAC 2 のボリュームやデジタルフィルタを操作したい
    I want to use Terra-Berry DAC2 volumes and digital filters.


    ジャイアンさんがTerra-Berry DAC2の初期設定をハードコピー付きで懇切丁寧に解説してくださっています。

    Giann explains the initial setup of Terra-Berry DAC2 in his web-site.


    以下の手順でプラグインを有効化することにより、Web UIからボリューム・デジタルフィルタ・サウンドモード・SRC/DACモードの操作が可能になります。
    (ボリュームはWeb UI以外のmpdクライアントからも操作可能です)

    If you make the plug-in effective, you can enable volume, digital filter, sound mode and SRC/DAC mode operations from the Web UI.
    (Volumes can also be manipulated by mpd clients other than the Web UI)


    1. config.txtの設定 (set up config.txt)

    /boot/config.txtの下記2行をコメントアウトして再起動する。
    Comment out the following two lines in /boot/config.txt and reboot.

    enable_uart=0
    init_uart_clock=230400
    

    2. スクリプトの選択 (Select Script)

    使用しているファームウェアのバージョンに合わせてスクリプトへのリンクを貼り直す。
    link to the script to match the version of firmware you are using.

    cd /home/pi/plugins/tb2
    

    旧ファームウェアの場合
    If you use Old Firmware

    ln -fs terraberry_2.py terraberry.py
    

    新ファームウェアの場合(Terra-BerryDAC2+)
    If you use New Firmware(Terra-BerryDAC2+)

    ln -fs terraberry_2plus.py terraberry.py
    

    3. mpd.confの編集 (Edit mpd.conf)

    ボリューム機能を使えるようにするために、mpd.conf(mpdの設定ファイル)の内容を編集します。
    Edit the contents of mpd.conf (mpd configuration file) to use the volume function.

    sudo nano /etc/mpd.conf
    

    開いたmpd.confから、以下の内容を探します。

    Search the following contents from the opened mpd.conf.

    # volume setting
    mixer_type "none" #hardware, software, external, none
    #mixer_type "external" #hardware, software, external, none
    
    # external volume control script
    #external_volume_control "/home/pi/plugins/tb2/volume.sh"
    #external_volume_control "/home/pi/plugins/sb32/volume.sh"
    

    上の内容の内、2ヵ所を編集します。
    先ずこの行の"none"を"external"に変更します。

    In this work, two of the above contents will be edited.
    First, change "none" in this line to "external".

    mixer_type "none" #hardware, software, external, none
    

    ↓ ↓ ↓

    mixer_type "external" #hardware, software, external, none
    

    次いでこの行の行頭の"#"を削除します。

    Then delete the "#" at the beginning of this line.

    #external_volume_control "/home/pi/plugins/tb2/volume.sh"
    

    ↓ ↓ ↓

    external_volume_control "/home/pi/plugins/tb2/volume.sh"
    

    “Ctrl”キーを押下げながら“O”キーを押し、続いて“Enter”キーを押して、編集内容を保存します。
    “Ctrl”キーを押下げながら“X”キーを押し、nanoを終了します。

    Hold down the “Ctrl” key, press the “O” key, and then press the “Enter” key to save the edits.
    Hold down the “Ctrl” key and press the “X” key to exit nano.

    続いて、mpdを再起動させます。

    sudo systemctl restart mpd
    

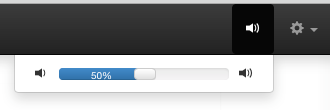
    これでボリュームを使えるようになりました。
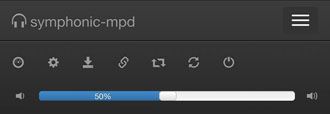
    WebUIを再読み込みさせて、以下のようになっていれば、成功です。

    The volume can now be used.
    If you reload the WebUI and it looks like this, the work is successful.
    09_ Volumue_Slider_01.png

    09_Volumue_Slider_02.jpg

    4. ボリューム復元サービスの自動起動設定 (Automatic startup settings for volume restore service)

    再起動時に、前回起動時のボリューム値を覚えさせておくことができます。

    When rebooting, the volume value at the last boot is set.

    sudo systemctl enable terradac_init
    

    システムを再起動後、使えるようになります。

    This feature will take effect after the system is restarted.

    sudo reboot
    

    5. プラグイン設定 (Plugin Settings)

    symphonic-mpd独自のプラグイン機能を使って、Terra-Berry DAC2の再生モード設定、デジタルフィルター設定、SRC/DACモード設定が可能になります。

    By using the plug-in function unique to symphonic-mpd, you can enable Terraberry DAC2 playback mode setting, digital filter setting, and SRC / DAC mode setting.

    nano /home/pi/plugins/.plugin.json
    

    でプラグイン定義を開き、以下の三ヵ所の記述を探し、“active”の部分を“no”から“yes”に編集します。

    Open the plug-in definition file, and look for the following three descriptions, change the “active” parameter from “no” to “yes”.

      {
        "menu"   :"Sound Mode",
        "active" :"yes",
        "icon"   :"sound-dolby",
        "command":"/home/pi/plugins/terra_setting.sh",
        "form"   :"/soundmode_setting.html",
        "output" :"",
        "success":"apply settings.... success!",
        "error"  :"apply settings.... error!"
      },
      {
        "menu"   :"Digital filter",
        "active" :"yes",
        "icon"   :"filter",
        "command":"/home/pi/plugins/terra_setting.sh",
        "form"   :"/filter_setting.html",
        "output" :"",
        "success":"apply settings.... success!",
        "error"  :"apply settings.... error!"
      },
      {
        "menu"   :"SRC/DAC Mode",
        "active" :"yes",
        "icon"   :"filter",
        "command":"/home/pi/plugins/terra_setting.sh",
        "form"   :"/srcdacmode_setting.html",
        "output" :"",
        "success":"apply settings.... success!",
        "error"  :"apply settings.... error!"
      }
    

    “Ctrl”キーを押下げながら“O”キーを押し、続いて“Enter”キーを押して、編集内容を保存します。
    “Ctrl”キーを押下げながら“X”キーを押し、nanoを終了します。

    Hold down the “Ctrl” key, press the “O” key, and then press the “Enter” key to save the edits.
    Hold down the “Ctrl” key and press the “X” key to exit nano.

    補足(ボリュームの範囲設定)

    Supplemental (Set Volume Range)

    nano /home/pi/plugins/tb2/tb2config.json
    

    で設定ファイルを開き、volumeのmaxとminを編集する。(設定可能な値は0〜255)
    Open the configuration file in and edit max and min of volume. (Possible values are 0 ~ 255)

      "volume": {
        "max": 255, 
        "min": 0
      }
    

    255はかなり大きいので、音量に注意すること
    255 is quite large number, so you must be careful with the volume.

  • mpdのデータベースをバックアップしたい
    To back up the mpd database


    mpdのデータベースはSDカードの/var/lib/mpd/tag_cacheに保存されています。
    このファイルをNASにバックアップしておくことができます。

    tag_cacheはホスト名に依らず"mpd_backup.tar.gz"という共通の名前でバックアップします。

    一方、設定ファイル類は"backup_ホスト名.tar.gz"という名前でホストごとに別名でバックアップします。

    バックアップ先はNASの直下(/var/lib/mpd/music/NAS)です。
    事前にNAS接続設定を完了しておく必要があります。

    The mpd database is stored on the SD card in/var/lib/mpd/tag _ cache.
    This file can be backed up to NAS.

    The tag _ cache is backed up under a common name "mpd _ backup.tar.gz" regardless of the host name.
    On the other hand, the configuration files are backed up under the name "backup _ hostname.tar.gz" for each host with a different name.
    The backup destination is directly under NAS (/var/lib/mpd/music/NAS).
    NAS connection settings must be completed in advance.


    バックアップ*(BackUp)*

    実行例(Exsample)
    /home/pi/util-backup.sh
    

    tag_cacheのリストア (restore tag _ cache)
    ・・・-t または (or)--tag_cache

    実行例(Exsample)
    /home/pi/util-restore.sh --tag_cache
    

    設定ファイル類のリストア (Restore configuration files)
    ・・・-c または(or) --conf

    実行例(Exsample)
    /home/pi/util-restore.sh --conf
    
  • Web UIからボリューム操作をしたい
    I want to perform volume operations from the Web UI


    symphonic-mpdの初期設定ではビットパーフェクトに留意するためボリューム操作を無効にしております。 Web UIや他のmpdクライアントからボリューム操作を行う場合は設定変更が必要です。

    By default, symphonic -mpd disables volume manipulation for bit perfect.
    If you want to perform volume operations from the Web UI or another mpd client, you must change the initial settings.

    sshで接続後、
    After connecting ssh,

    sudo nano /etc/mpd.conf
    

    を実行してファイルをエディタで開き、
    to open the file using an editor

    # volume setting
    mixer_type "none" #hardware, software, none
    

    と記載されている箇所を探してください。
    Please search the line that is.

    ハードウェアボリュームを使う場合は
    For useing hardware volumes

    mixer_type "hardware"
    

    ソフトウェアボリュームを使う場合は
    For use the software volumes

    mixer_type "software"
    

    と編集し、Ctrl-o Enter Ctrl-x と操作してファイルを保存してエディタを閉じてください。
    , then Ctrl-o Enter Ctrl-x to save the file and close the editor.

    最後に、
    Finally,

    sudo systemctl restart mpd
    

    と入力してmpdを再起動します。
    to restart mpd.

  • Web UI以外のmpdクライアントを使いたい
    I want to use an mpd client other than the Web UI


    MPaDやMPoDなど、Web UI以外のmpdクライアントを使いたい場合、TCP6600ポートでの待ち受けを有効にする必要があります。


    If you want to use mpd clients other than the Web UI, such as MPaD or MPoD, you need to enable listening on TCP 6600 ports.

    sshで接続後、
    After connecting ssh,

    sudo nano /etc/mpd.conf
    

    としてmpdの設定ファイルを開き、
    Open the mpd configuration file

    #port "6600"
    #bind_to_address "any"
    

    と記述された行を探し、行頭の「#」を削除してください。
    search the lines above and remove the leading "#".

    Ctrl-o Enter Ctrl-x でファイルを保存してエディタを閉じます。
    Ctrl-o Enter Ctrl-x to save the file and close the editor.

    最後に
    And finally,

    sudo systemctl restart mpd
    

    としてmpdを再起動してください。
    Restart mpd.

    TCP6600ポートでの待ち受けを有効にすると音質に影響があります。利便性との兼ね合いでご判断くださいませ。
    Enabling listening on a TCP 6600 port affects sound quality. You should make a decision in exchange for convenience.

  • USBメモリを使いたい
    I want to use a USB flash drive.


    symphonic-mpdの初期設定では、USBポートへのバスパワー供給を停止しているため、USBメモリを使いたい場合は設定変更が必要です。

    By default, symphonic-mpd stops supplying bus power to the USB port, so if you want to use USB memory, you need to change that setting.

    sshで接続後、
    After connecting ssh,

    sudo nano /etc/rc.local
    

    としてファイルをエディタで開き、
    Open the file in the editor.

    # Disable All USB Port (Without Ethernet)
    sudo hub-ctrl -b 1 -d 2 -P 2 -p (省略...Omit...)
    

    と記載されている箇所を探してください。
    このsudo hub-ctrlで始まる行の先頭に「#」を追加することでUSBポートへのバスパワー供給が有効になります。
    Please search the lines above.
    Add a "#" to the beginning of the line that starts with "sudo hub-ctrl" to enable bus power delivery to the USB port.

    <変更後 Changed>
    # Disable All USB Port (Without Ethernet)
    #sudo hub-ctrl -b 1 -d 2 -P 2 -p (省略...Omit...)
    

    Ctrl-o Enter Ctrl-x と操作してファイルを保存してエディタを閉じてください。
    Press Ctrl-o Enter Ctrl-x to save the file and close the editor.

    最後に、
    Finally

    sudo systemctl reboot
    

    と入力して再起動します。
    to reboot.

    USBの利用は音質に影響があります。利便性との兼ね合いでご判断くださいませ。USBメモリやSDカードから再生する際、WAVが再生できないという制限事項があります。WAVを再生する場合は、mpdの設定でDirect I/Oを無効にする必要があります。

    Using USB affects the sound quality. Please make a decision in consideration of convenience. There is a restriction that WAV cannot be played back from USB memory or SD card. If you want to play the WAV, you must disable Direct I/O in the mpd configuration.

  • カバーアートを表示したい
    I want to show cover art


    音楽ファイルを格納しているフォルダに

    In the folder containing music

    • Folder.jpg
    • folder.jpg
    • アーティスト名 - アルバム名.jpg (ハイフンの前後に半角スペースが必要です)
    • Artist name - Album name .jpg (A space is required before and after the hyphen.)

    のいずれかのファイル名でjpgを格納してください。
    Use one of the file names to store jpg.

    Folder.jpgまたはfolder.jpgに統一することをお勧めします。(アーティスト名はしばしば「アーティスト名 feat.だれそれ」と変化していることがあり、カバーアートがヒットしなくなることがあるため)

    It is recommended that you standardize on Folder.jpg or folder.jpg. (The artist name often changes and cover art may not be a hit.)

  • 固定IPアドレスを設定したい
    I want to set a static IP address

    設定を変更する前に、ルーターの設定を確認して、DHCPが割り当てられていないIPアドレスを特定する必要があります。

    Before changing the static IP address, you should check the router settings to get the address that is not assigned to DHCP.

    sudo nano /boot/eth0.network
    

    で設定ファイルを開き、

    Open the configuration file.

    • DHCP=yes

    の行頭に「#」を追加してコメントアウトしてください。

    Comment out by adding "#" to the beginning of the line.

    • Address
    • Gateway
    • DNS

    の3行については行頭の「#」をはずし、IPアドレス・ネットマスク、デフォルトゲートウェイ、DNSサーバをお使いの環境に合わせて設定してください。

    Remove the "#" at the beginning of each line and set the IP address, netmask, default gateway, and DNS server according to your environment.

    Ctrl-o Enter Ctrl-x
    

    でファイルを保存し、

    Save the file, and then click

    sudo reboot
    

    で再起動してください。
    Please restart.

  • NAS接続先をIPv6でアドレス指定したい
    I want to specify the NAS destination with IPv6 address


    mikeさんがNASの接続先をIPv6アドレスで指定する際の設定方法を検証してくださいました。

    mike has verified how to set the connection destination of NAS by IPv6 address.

    English version is here,


    みなさま、

    パパリウスさまの「DirettaがIPv6を採用した理由」のご報告に刺激され、ここ2~3日
    SMPD 0.8.19 での ipv6 接続トライをしておりました。
    結論は簡単に接続できる、ですが、その手順と指定内容を簡単にご報告いたします。

    NASには浮いていた、Tinker Board S にDebian と Samba をインストールして使いました。
    SMPD 0.8.19 はすでに ipv6 のモジュールが動作しており、ifconfig で ipv4 と ipv6 の
    link:gloval、link:local のアドレスが確認できました。
    NASも同様の確認を行い全く同じように ipv4 と ipv6 が併存していることを確認しました。

    そして、http://[SMPDのipv4アドレス]/音楽ディレトリー名 と指定し、
    SMPD のympd へアクセスし、きちんと表示することを確認しました。

    SMPDの NAS setting に、//NAS ipv6 link:local アドレス@eth0/音楽ディレクトリー名 
    と指定
    し、ユーザー名とパスワードも入力し、nasの確認に入りました。

    少し時間がかかったように思います無事 success と表示され、reboot 指示が出ました。

    リブート後はいつもどおりに曲やplaylistの指定ができ、同じように再生しました。

    音質は変わりません。良くもなりませんし悪くもならないようです。

    ただ、数時間再生を続けていると稀に瞬断することがありました。

    私の環境は一つのNASを使い同時に複数のプレイヤーで再生しているため、 ipv4 と ipv6 とで
    競合が起きているのかもしれませんが本当のところはわかりません。

    ipv4 を停止させる方法をちょっとだけ探しましたが見つからなかったのであきらめて現在は
    ipv4 接続に戻しています。

    ipv6 接続するさいに気をつけることは、http:// 接続の際は、ipv6 アドレスを [] で囲むこと、
    そして、nas の音楽ディレクリトー指定のときに、ipv6 のポート名を @ につづいて指定することです。

    Debian/Raspbian の場合は、ポートは、eth0 なので、@eth0 を ipv6 の link:local アドレスに続いて記述する必要があります。
    Windows の場合は、数字で指定するようです。(ex. @8)

    以上ご報告まで。


    I want to specify the NAS destination with IPv6 address

    Hi,

    I was inspired by Paparius's report on the reason why Diretta adopted IPv6, and I have been trying ipv6 connection with SMPD 0.8.19 for the last couple of days. The conclusion is "Easy to connect", so I will briefly report the procedure and specified contents.

    I installed Debian and Samba on Tinker Board S which is not used for NAS.
    In SMPD 0.8.19, the ipv6 module is already running, and the ipv4 and ipv6 link: gloval and link: local addresses were confirmed by ifconfig.
    The same confirmation was made on the NAS, and it was confirmed that ipv4 and ipv6 coexist in exactly the same way.

    Then, I specified http: // [SMPD ipv4 address] / music directory name, and confirmed that the SMPD ympd was accessed and displayed properly.

    In the NAS setting of SMPD, specify // NAS ipv6 link: local address @ eth0 / music directory name, enter the user name and password, and enter nas confirmation.

    I think it took a while. The message "successful" was displayed and the reboot instruction was issued.

    After rebooting, you can specify songs and playlists as usual and play them in the same way.

    The sound quality does not change. It doesn't get better or worse.

    However, there were rare occasions when the playback continued for several hours.

    Since my environment uses a single NAS and plays with multiple players at the same time, there may be a conflict between ipv4 and ipv6, but I don't know the truth.

    I just searched for a way to stop ipv4, but since I couldn't find it, I gave up and now revert to ipv4 connection.

    When connecting to ipv6, please note that when http: // is connected, enclose the ipv6 address in \[\], and when specifying the music directory of nas, follow the port name of ipv6 with @. Is to specify.

    For Debian / Raspbian, the port is eth0, so you need to write @ eth0 following the link: local address of ipv6.
    For Windows, it seems to specify numbers. (ex. @ 8)

    That's all.

    by mike at2019-07-12 14:35

  • 有線LANのLEDを消灯したい
    Turn off the wired LAN LED


    LEDの操作に使うツールをダウンロードします。

    Download the tool used to operate the LEDs.

    wget -O llctl "https://drive.google.com/uc?id=0B-6zmEDJwxZEbmJkU3g2MlhMQWs&export=download"
    chmod +x llctl
    

    次に
    Next

    sudo nano /etc/rc.local
    

    で設定ファイルを開き末尾のexit 0より上に下記の1行を追加してください

    Open the configuration file and add the following line above the exit 0 at the end

    sudo /home/pi/llctl f0 l0 d0
    
    Ctrl-o Enter Ctrl-x
    

    でファイルを保存します。
    Save the file.


    RPi3B+ではconfig.txtに下記を設定することで消灯可能です。(sunatomoさん、情報提供ありがとうございます)

    RPi3B + can be turned off by setting the following in config.txt. (thank you. sunatomo-san for the information.)

    dtparam=eth_led0=14

    dtparam=eth_led1=14

  • DSD再生(PCM変換)でノイズが聞こえる
    Noise is heard during DSD playback (PCM Conversion)


    DSDのPCM変換再生時のホワイトノイズですが

    White noise during PCM conversion of DSD

    /etc/mpd.conf

    samplerate_converter "soxr very high" 
    

    を有効にすると解消するという報告をいただきました。
    ご参考になさってください。

    I received a report that it will be resolved if you enable.
    Please refer to it.

  • 再生した曲がキューから消えていく
    The song you played disappears from the cue.

    MPD画面の最下部に「Consume」というボタンがあります。

    このボタンががONになっていると、再生された曲がキューから削除されていきます。

    There is a "Consume" at the bottom of the Settings screen.

    When this button is ON, the played songs are deleted from the queue.

  • 曲が再生されない。動作が不安定。
    The song does not play. The operation is unstable.


    Windowsの共有フォルダをNASとして利用している場合など、特定の条件で下記のような現象が報告されています。

    The following symptoms have been reported under certain conditions, such as using Windows Shared Folders as NAS:.

    • 曲名は正常に表示されるが、再生ボタンを押しても曲が再生されない。

    • The song title is displayed correctly, but the song does not play when the play button is pressed.

    この現象は、Direct I/Oを無効にすることで改善するケースがあります。
    Disabling Direct I/O may improve this behavior.


    sshでログインし、

    Login ssh

    sudo nano /etc/mpd.conf
    でmpdの設定ファイルを開いて

    Open the mpd configuration file
    direct_io "yes"
    の行を、#でコメントアウトしてください。

    Comment out the line with #.

    ファイルの保存は、Ctrl+o を押した後、Enterで確定してください。
    エディタの終了はCtrl+xです。
    To save the file, press Ctrl + o, and then press Enter to confirm.
    Exit the editor with Ctrl + x.

    設定ファイルの編集が完了したら、

    When you have finished editing the configuration file, click
    sudo systemctl restart mpd
    でmpdを再起動してください。
    (sudo rebootでラズパイを再起動してもOKです)
    Restart mpd.
    (You can also reboot with sudo reboot.)

  • Windows PCからRaspberry PiにSSHでリモートアクセスしたい
    I want to remotely access the Raspberry Pi from a Windows PC via SSH


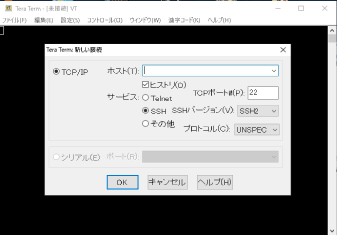
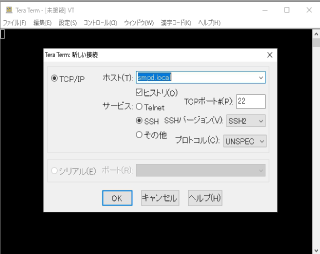
    ここではTeraTermを実例に挙げて説明します。 TeraTerm起動後、下図のようなパネルが表示されます。

    Here, TeraTerm is used as an example for explanation.
    After starting TeraTerm, the following panel will be displayed.


    Tera_Term_01.png


    “ホスト(T)”に“smpd.local”と入力します。
    Raspberry Piを固定IPアドレスで運用している場合は、設定したIPアドレスを入力します。

    Enter "smpd.local" for "Host (T)".
    If a static IP address is set for the Raspberry Pi, enter the set IP address.


    Tera_Term_02.png


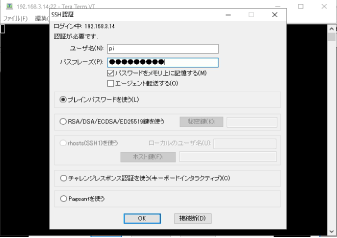
    “ユーザー名(N)”に“pi”を、“パスフレーズ(P)”には“raspberry”と入力します。

    Enter “pi” for “User Name (N)” and “raspberry” for “Passphrase (P)”.


    Tera_Term_03.png


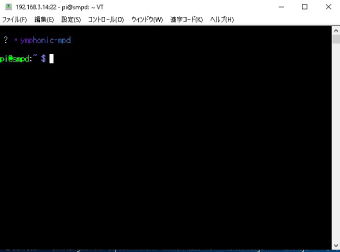
    Raspberry Piとの接続が完了すると、以下の様な画面に変わります。

    When the connection with the Raspberry Pi is completed, the following screen will appear.


    Tera_Term_04.png


    画面上のカーソルの位置からコマンドを入力します。

    Enter a command from the cursor position on the screen.

  • MacからRaspberry PiにSSHでリモートアクセスしたい
    I want to remotely access the Raspberry Pi from a Mac via SSH


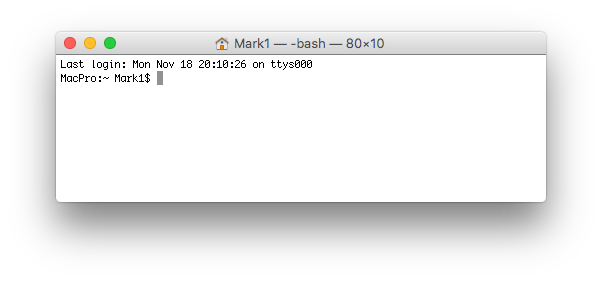
    Mac OS Xには標準で“ターミナル”が備わっています。格納場所は“アプリケーション”フォルダ内の “ユーティリティ”フォルダです。Macからのリモートアクセスには、この“ターミナル”を使用します。 下図は“ターミナル”起動後のウィンドウです。

    Mac OS X has a “terminal” as standard. The storage location is in the “Utilities” folder in the “Applicatios”. Use this “Terminal” for remote access from a Mac.
    The figure below shows the window after starting “Terminal”.


    Terminal_01.png
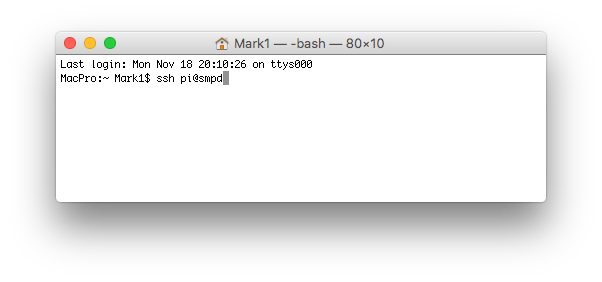
    以下を入力します。

    Enter the following:

    ssh pi@smpd
    

    Terminal_02.png

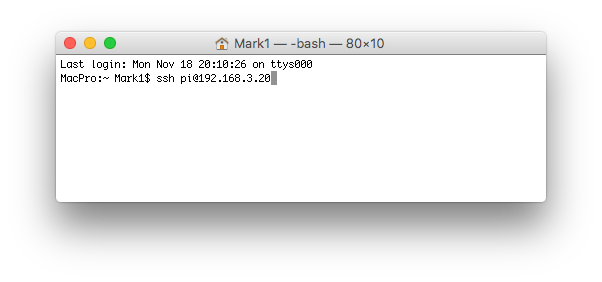
    Raspberry Piに固定IPアドレスを設定している場合は、設定したIPアドレスを入力します。図は一例です。

    If a static IP address has been set for the Raspberry Pi, enter the set IP address. The figure is an example.

    Terminal_03.png

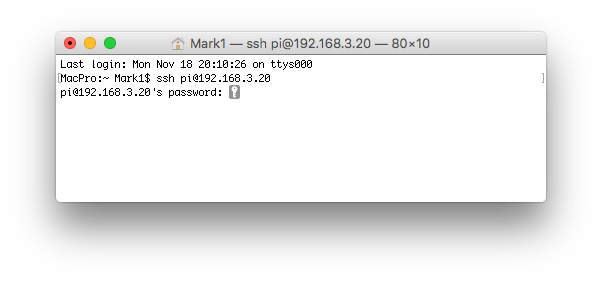
    “パスワード”の入力を求めてくるので、“raspberry”と入力します。
    入力される文字は表示されません。

    Enter "raspberry" when prompted for the "password".
    The entered characters are not displayed.

    Terminal_04.png

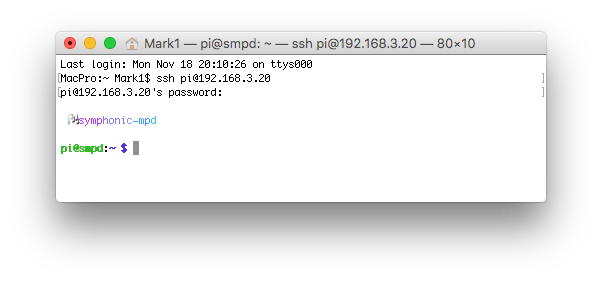
    以上でRaspberry Piとのリモートアクセスが成立します。

    This establishes remote access with the Raspberry Pi.

    Terminal_05.png

    画面上のカーソルの位置からコマンドを入力します。

    Enter a command from the cursor position on the screen.

  • WindowsユーザーのためのSSHとの付き合い方
    Introductions of SSH for Windows Users


    Windows10ではコンマンドプロンプトからSSHを使うことができます。初めての方はとりあえず、これで動かしてみると良いでしょう。しかし、操作性は良いとはいえないので、本格的にSMPDの内部を弄り回すためにはWindows専用のSSHプログラムを使うとよいでしょう。日本語ならTeraTerm、海外の方にはPuttyがお勧めです。使い方はそれぞれのリンク先を参照して下さい。

    ここではWindows10のコンマンドプロンプトからのSSHの使い方についてご紹介します。


    You can use SSH from a command prompt in Windows 10.
    If you're new to SSH on Windows, it's a good place to start from here. However, the usability isn't great, so you might want to use a SSH client program for Windows to setup the deep internals of SMPD. I recommend TeraTerm for Japanese and Putty for foreigners. Please refer to the previous link for how to use it.


    This section describes how to use SSH from a Windows 10 command prompt.

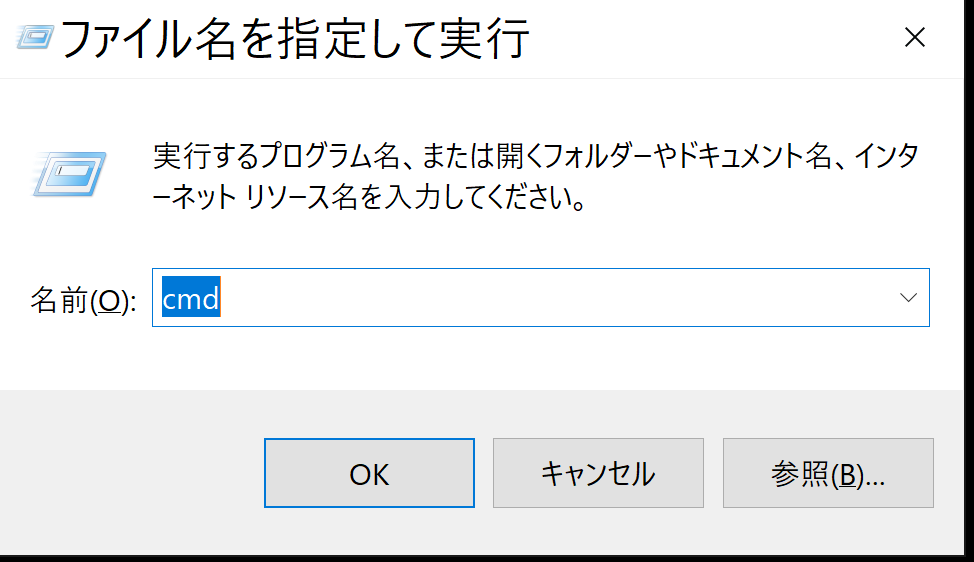
    下記のどちらかの方法で「ファイル名を指定して実行」画面を表示させます。

    • 画面左下のWindowsボタンを右クリックして、「ファイル名を指定して実行」を選択
    • Windowsキーと"R"キーを同時打鍵

    Open the "Run As" screen using one of the following methods.

    • Right-click the Windows button at the bottom left of the screen and select "Run As"
    • simultaneous typing of Windows key and "R" key


    「cmd」と入力すれば、起動出来ます。

    You can start command prompt by entering "cmd".


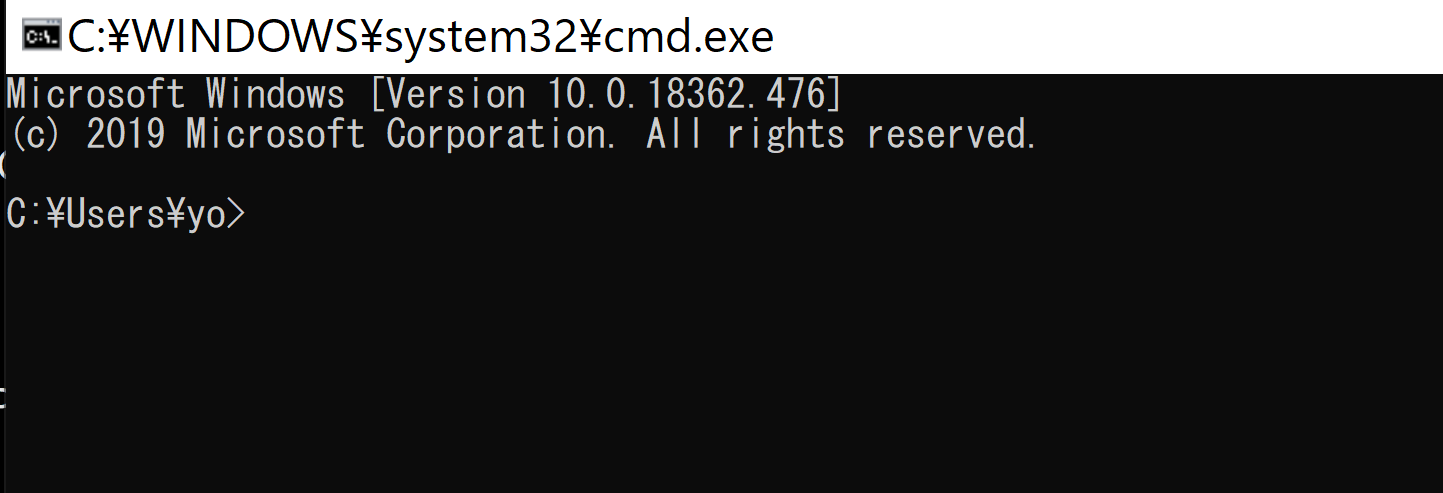
    これは起動直後のコマンドプロンプト画面です。

    This is the command prompt screen immediately after starting.


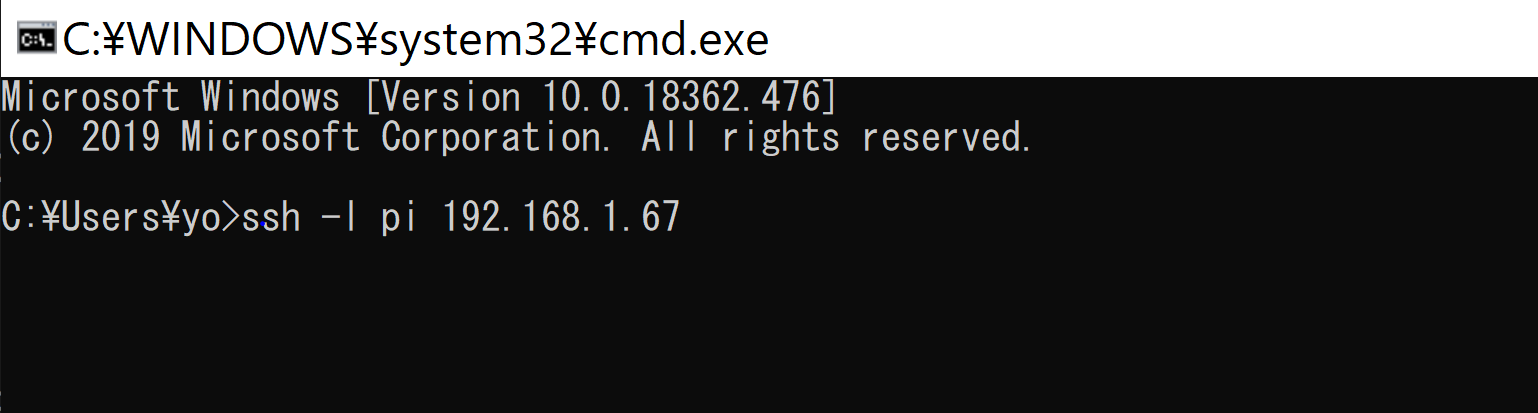
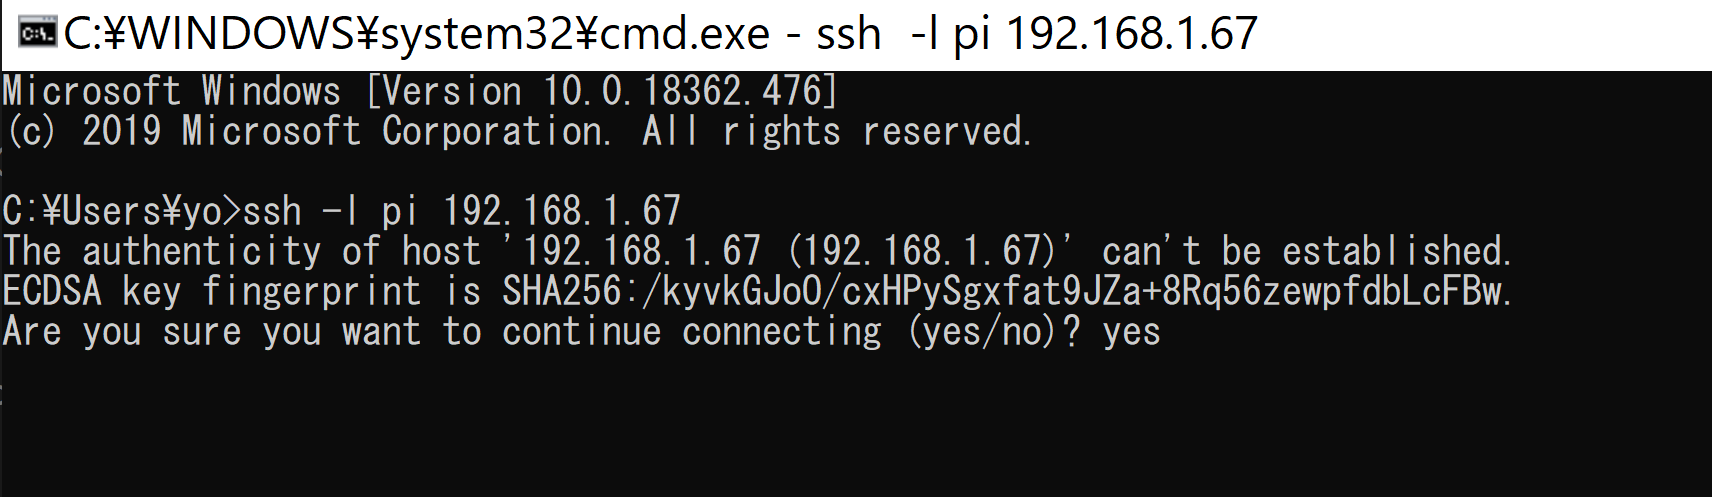
    「ssh -l pi ipアドレス」と入力し、Windowsのsshクライアントプログラムを起動します。piというのはSMPDのユーザ名です。

    Type "ssh-l pi ip_address" to start the Windows ssh client program. pi is the SMPD user name.


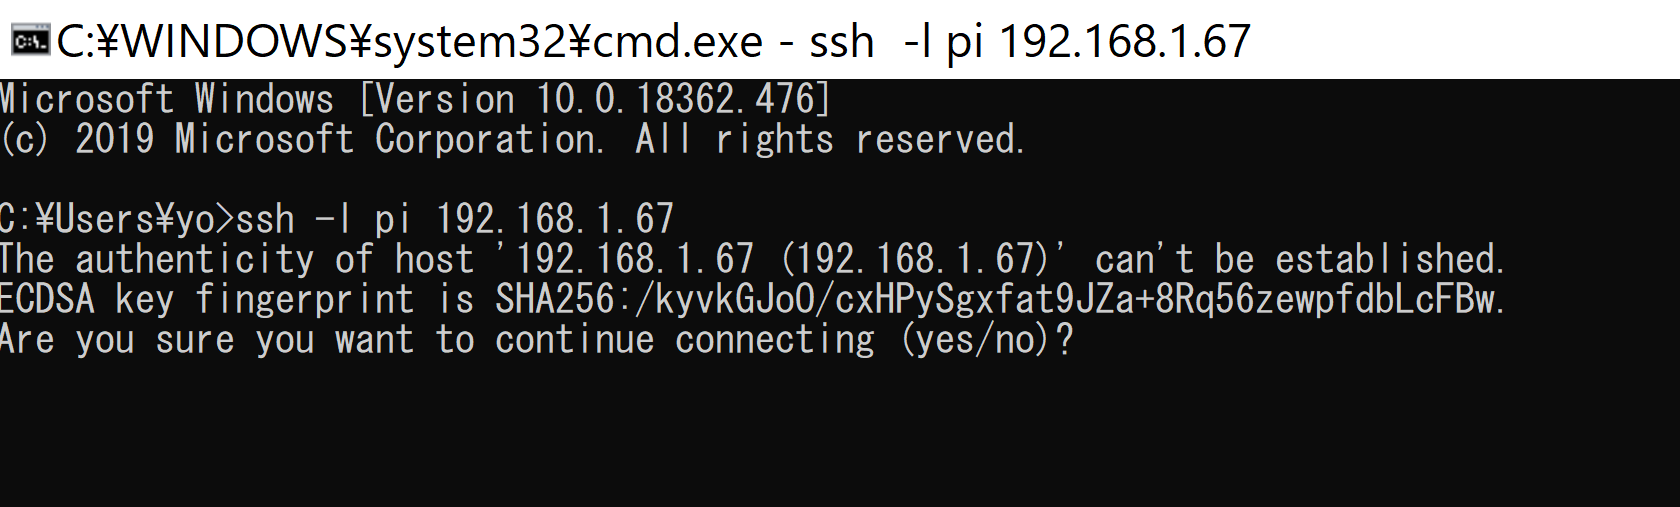
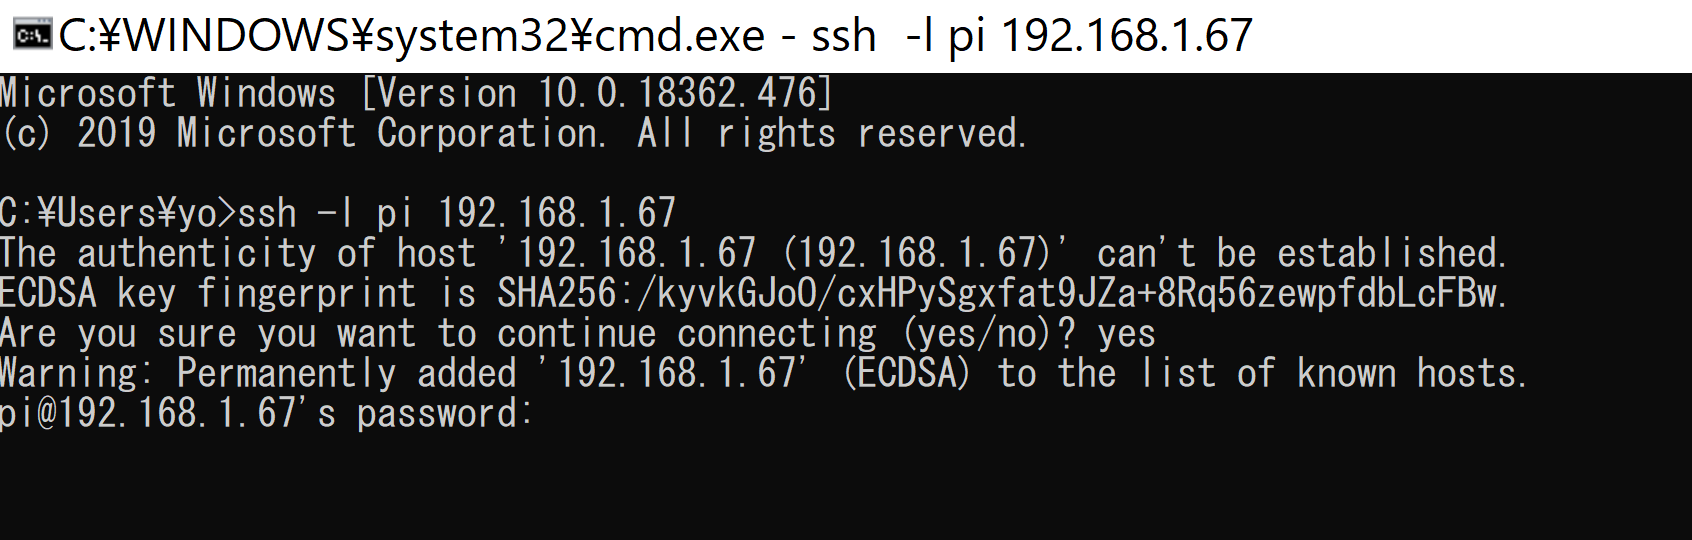
    初めてSMPDと接続する時はこのような警告メッセージが表示されます。yesと入力します。

    When you connect to SMPD for the first time, a warning message like this will be displayed. Enter "yes” like this.


    パスワード画面です。

    Password screen


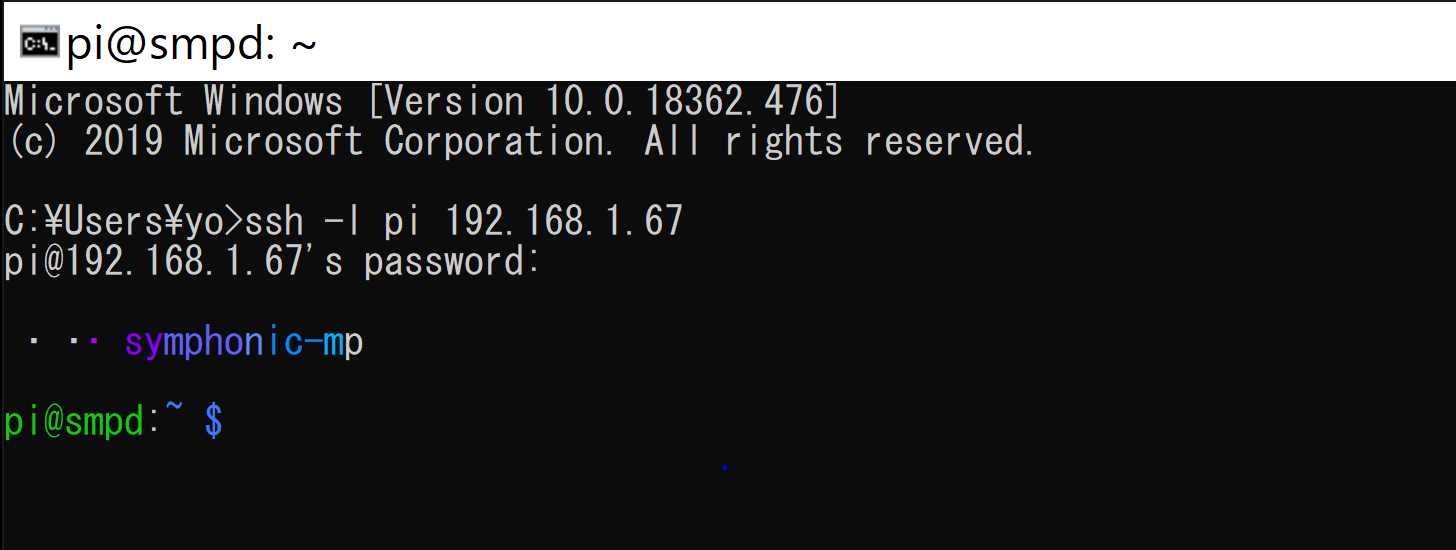
    "raspberry"とパスワードを入力します(""の間のraspberryだけ入力して下さい)。

    Enter the password as "raspberry" (Please enter only raspberry between "").


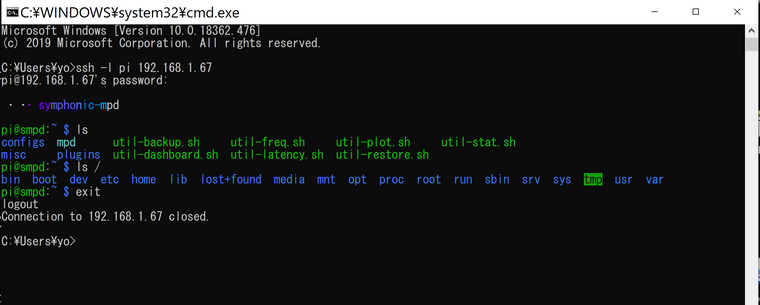
    これでSMPDのSSHホスト機能が使えるようになりました。試しに、ls(ファイル、ディレクトリの表示機能)と入力してみて下さい。

    You can now use the SSH host feature of SMPD. Try typing "ls" (Command to view files and directories).

    SSH8.PNG


    おめでとうございます。後はお好きにSMPDを弄り回しましょう。

    Congratulations. Let's play with SMPD as you like.

  • WindowsユーザーのためのSSHの基本:WindowsでSSHクライアント「PuTTy」を使用してsymphonic-mpdに接続する方法
    SSH essentials for Windows : How to connect to symphonic-mpd using SSH client “PuTTy” on Windows


    Windowsからsymphonic-mpdにリモートアクセスするには、PuTTYなどのSSHクライアントソフトウェアをWindowsにインストールする必要があります。 “https://www.putty.org”からPuTTYをダウンロードしてインストールできます。 PuTTYを使用してsymphonic-mpdに接続する手順は次のとおりです。

    For remote access to symphonic-mpd from Windows, you need to install a SSH client software such as PuTTY on Windows. You can download and install PuTTY from “https://www.putty.org”.

    Here are steps to connect to symphonic-mpd using PuTTY.

    注:これは一例であり、任意のSSHクライアントソフトウェアを使用できます。

    Note : This is just an example and you can use any SSH client software you like.


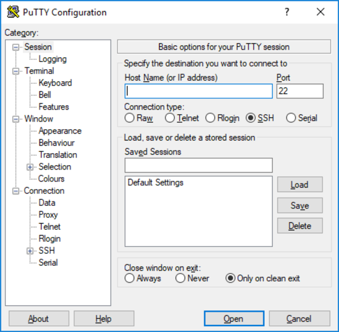
    (1) PuTTYの起動 (Launch PuTTY)


    putty.exeまたはデスクトップのショートカットをダブルクリックして、PuTTYを起動します。 すると、下図のようなPuTTYの設定ウィンドウが表示されます。

    Launch PuTTY by double-clicking the putty.exe program or the desktop shortcut. Then, PuTTY configuration Windows below appears.


    PuTTy_01_Launch_PuTTY.png


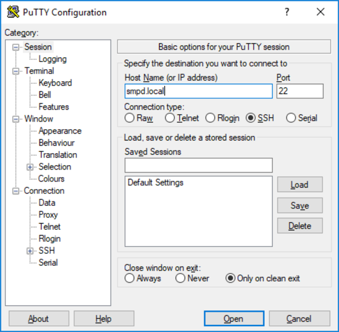
    (2) symphonic-mpdへの接続 (Connect to symphonic-mpd)


    ホスト名として「smpd.local」(またはsymphonic-mpdがインストールされているraspberry piの固定IPアドレス)を入力し、「Open」ボタンをクリックします。 他の設定を変更する必要はありません。

    Enter “smpd.local” (or IP address of the raspberry pi where symphonic-mpd is installed) as Host Name then click “Open”. You don’t need to change other settings.


    PuTTy_02_Connect_to_symphonic-mpd.png


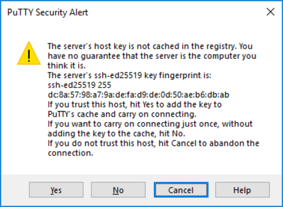
    「smpd.local」への初回接続時のみ、下図のウィンドウが表示されます。 「Yes」をクリックしてください。

    When you try to connect to “smpd.local” first time, the following Windows is shown. Just click “Yes”.


    PuTTy_03_Just click Yes.png


    (3) symphonic-mpdへのログイン (Login to symphonic-mpd)


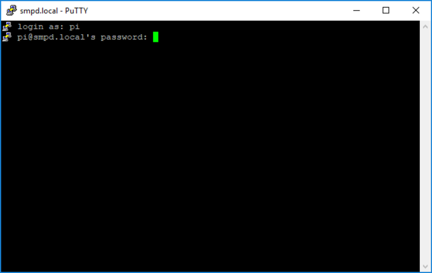
    ユーザー名とパスワードを入力し、symphonic-mpdにログインします。

    Login to symphonic-mpd by entering the following user and password.

    User : pi
    Password : raspberry


    PuTTy_04_Login_to_symphonic-mpd.png


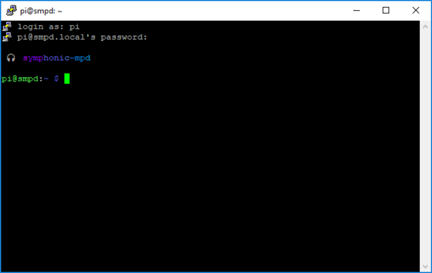
    接続が確立されると、プロンプトからコマンドを入力できるようになります。

    Once the connection is established, you can type commands at the prompt.


    PuTTy_05_Login_to_symphonic-mpd.png