インストール
Installation Guide
図入りのPDF版をご覧になりたい方は以下のリンクをクリック
A PDF version with illustrations is available at the link below.
Installation Guide.pdf
1. ディスクイメージの準備
Preparing the disk image
ディスクイメージをダウンロードし、解凍します。
Download and unzip the disk image.
2. 起動ディスクの準備
Writing the image on micro SD card
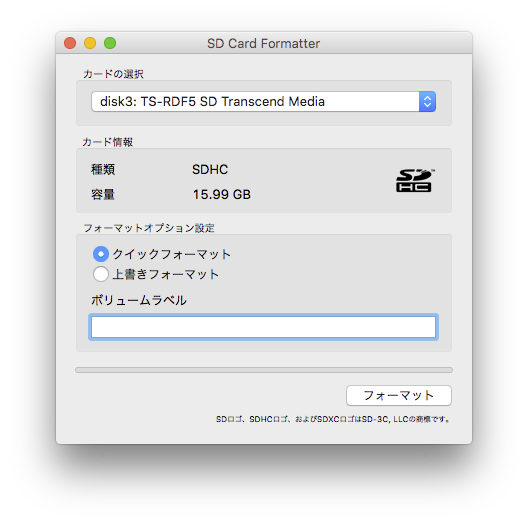
2GB 以上の容量を持ったmicroSD カードを準備し、SD Memory Card FormatterなどでなどでmicroSDカードの初期化をします。
Prepare a microSD card with a capacity of 2GB or more, and initialize it with SD Memory Card Formatter.
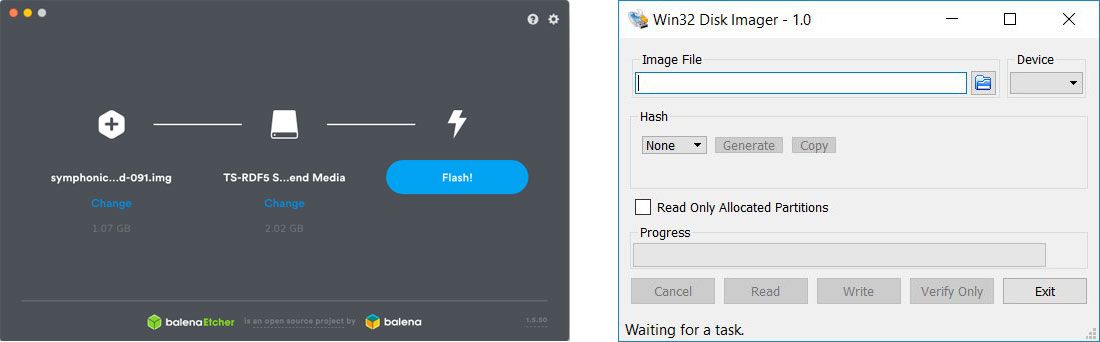
balenaEtcher やWin32 Disk Imager などでイメージを書き込みます。
Write the image with balenaEtcher or Win32 Disk Imager on a microSD card.
3. dt-blob.bin
注:スレーブモードで駆動するI2S HATカードのユーザーは、この内容を読み飛ばして構いません。
Note:Users of the I2S HAT card operating in slave mode can skip this content.
3.1 dt-blob.binの置き換え
Replace dt-blob.bin
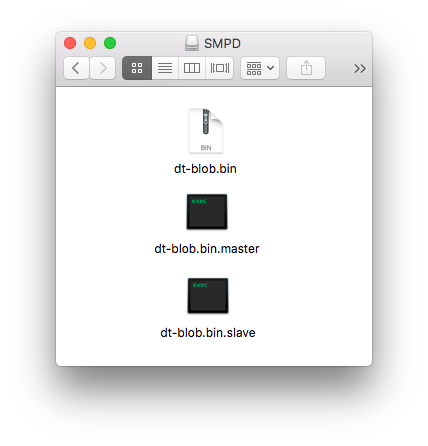
symphonic-mpdはbootディレクトリにdt-blob.binを配置しています。これはraspberry piに、音楽再生に最適化されたPLL (Phase Locked Loop) を生成する機能を付加するためのファイルです。マスターモードとスレーブモードでは、最適化されるべきPLLの値が違います。しかしdt-blob.binにマスターモードとスレーブモードを切り替える機能はありませんので、手動でdt-blob.binファイルを置き換えていただく必要があります。その為に3種類のdt-blob.bin、具体的にはdt-blob.bin、dt-blob.bin.master、dt-blob.bin.slaveの3つのファイルが配置されています。デフォルトのdt-blob.binはスレーブ用です。よって、スレーブモード用I2S HATカードを使用する場合は、dt-blob.binを置き換える必要はありません。
symphonic-mpd has dt-blob.bin in the boot directory. This is a file to add a function to generate PLL (Phase Locked Loop) optimized for music playback to raspberry pi. There is a difference in the PLL value to be optimized between master mode and slave mode. However, dt-blob.bin does not have a function to switch between master mode and slave mode, so it is necessary to switch the dt-blob.bin file manually. For that purpose, three types of dt-blob.bin, specifically, dt-blob.bin, dt-blob.bin.master, and dt-blob.bin.slave are arranged. The default dt-blob.bin is for slave mode.
Therefore, it is not necessary to replace dt-blob.bin when using an I2S HAT card for slave mode.
また、マスターモード用I2S HATカードをスレーブ用dt-blob.binで駆動させても、問題は生じません。ですので、マスターモード用I2S HATカードのユーザーであっても、この手順を省くことがきます。ただしdt-blob.binをdt-blob.bin.masterで置き換えることによって、再生音質の更なる向上を期待できます。
There is no problem even if I2S HAT card for master mode is driven by dt-blob.bin for slave. Even if you are a user of I2S HAT card for master mode, you can skip this step. However, by replacing dt-blob.bin with dt-blob.bin.master, you can expect some improvement in playback sound quality.
置き換える方法は簡単です。boot用マイクロSDカードをPCにマウントさせます。マイクロSDカード内に見えるdt-blob.binをリネームするか削除してください。その上でdt-blob.bin.masterをdt-blob.binにリネームします。
The replacement method is easy. Mount the micro SD card for boot on the PC. Rename or delete dt-blob.bin that is visible in the micro SD card. Then rename dt-blob.bin.master to dt-blob.bin.
ここでraspberry piのPLL (Phase Locked Loop) について簡単に説明します。
ラズパイのクロック(19.2MHz)には5つのPLLがぶら下がっており、各種の機能にクロックを提供しています。
Here is a brief description of raspberry pi’s PLL (Phase Locked Loop). Five types of PLL are connected to the raspberry pi’s clock (19.2MHz) to provide clocks for various functions.
5種のPLLはそれぞれ以下のような使い分けがされてます。
Each of the five PLLs is used as follows:
-
PLLA …未使用 (unused)
-
PLLB …CPUのクロックのみに使用(可変) (Used only for CPU clock, variable)
-
PLLC …GPUやSDRAM等のクロックに使用(可変)(Used for GPU and SDRAM clocks, variable)
-
PLLD …I2S等で使用(デフォルトで500MHz) (Used by I2S etc., 500MHz by default)
-
PLLH …HDMI等で使用
raspberry piでは通常、I2Sで使用する44.1KHz系/48KHz系のBCLKは、PLLD(500MHz)を分数分周方式のPLLで算出し、MASHアルゴリズムによって生成しています。
In raspberry pi, 44.1KHz / 48KHz BCLK used in I2S is usually calculated from PLLD (500MHz) using a fractional frequency division PLL and generated by the MASH algorithm.
例えば44.1KHz音源のBCLK 2,822,400Hzを生成する場合、2,808,988Hzと2,824,858Hzの2つの周波数を特定の比率で組み合わせて、その平均から2,822,400HzをBCLKとして生成しています。
For example, when generating BCLK 2,822,400Hz of 44.1KHz sound source, two frequencies of 2,808,988Hz and 2,824,858Hz are combined at a specific ratio, and 2,822,400Hz is generated as BCLK from the average.
しかし、このようにして生成されたクロックは、音楽再生用途としては不向きです。そのためsymphonic-mpdではMASH動作を切り、PLL周波数は44.1KHz/48KHzとオシレータ(19.2MHz)の公倍数から求めています。また再生時には44.1KHz系用PLLと48KHz系用PLLを自動的に切り替えています。dt-blob.binによってこうした動作を可能にし、クロックの品質を上げることに成功しています。
However, the clock generated in this way is not suitable for music playback. Therefore, in symphonic-mpd, the MASH operation is turned off, and the PLL frequency is obtained from the common multiple of 44.1KHz / 48KHz and the oscillator (19.2MHz). In addition, the 44.1KHz PLL and the 48KHz PLL are automatically switched during playback. The default dt-blob.bin, which is for slave mode, has made this possible and has succeeded in improving clock quality.
スレーブモードで動作するI2S HATカードを使用する場合は、dt-blob.binをdt-blob.bin.masterで置き換えないでください。
Do not replace dt-blob.bin with dt-blob.bin.master when using an I2S HAT card that operates in slave mode.
dt-blob.bin.masterでは、不要なPLLの設定をオフにしています。この状態でスレーブモード用I2S HATを駆動させると、PLL周波数が理想のそれとは全く違っていることから、再生速度やピッチに問題が生じます。
In dt-blob.bin.master, unnecessary PLL settings are turned off. When the slave mode I2S HAT is driven in this state, the PLL frequency is completely different from the ideal one, which causes problems with playback speed and pitch.
また、RTDMドライバーの動作周期ともずれが生じるため、頻繁にタイマーオフセットの調整が入り、最適な動作からは程遠い状態になります。結果として、音質が大幅に低下します。
In addition, because the operation cycle of the RTDM driver is shifted, the timer offset is frequently adjusted, and it is far from optimal operation. As a result, the sound quality is greatly reduced.
そのような理由から、dt-blob.bin.masterファイルはスレーブモードで動作するI2S HATカードでは使うべきではないのです。
For that reason, the dt-blob.bin.master file should not be used for I2S HAT cards operating in slave mode.
3.2 スレーブモードとマスターモードについて
Explanation of slave mode and master mode
多くのI2S HATカードはスレーブモードで駆動しています。ここで言う「スレーブ」とは、Raspberry PiからI2S HATカードに供給されるデジタルデータが、Raspberry Piで生成されたクロックにもとづいて供給されていることを意味します。
Many I2S HAT cards operate in slave mode. The term "slave" here means that the digital data supplied from the Raspberry Pi to the I2S HAT card is supplied based on the clock generated by the Raspberry Pi.
対して一部のI2S HATカードは自らオシレーターを搭載し、I2S HATカード上のオシレーターが生成したクロックをRaspberry Piに供給し、そのクロックにもとづいてRaspberry PiからI2S HATカードにデータを供給させています。こうした駆動方法を「マスターモード」と呼びます。
On the other hand, some I2S HAT cards have their own oscillators, and can supply the clock generated by the oscillator on the I2S HAT card to the Raspberry Pi. These I2S HAT cards are supplied with data from the Raspberry Pi based on the clock generated by themselves. Such a driving method is called “master mode”.
4. Raspberry Pi の起動
Start Raspberry Pi
microSD カードをRaspberry Pi にセットし、Raspberry Pi を起動させます。
Raspberry Pi 後面のLED は、起動処理完了後、自動的に消灯します。
Set microSD card in Raspberry Pi and start Raspberry Pi.
The LED on the back of the Raspberry Pi will automatically turn off after the startup process is complete.
5. NAS の設定
NAS settings
5.1 SETTING パネルの表示
Display SETTING panel
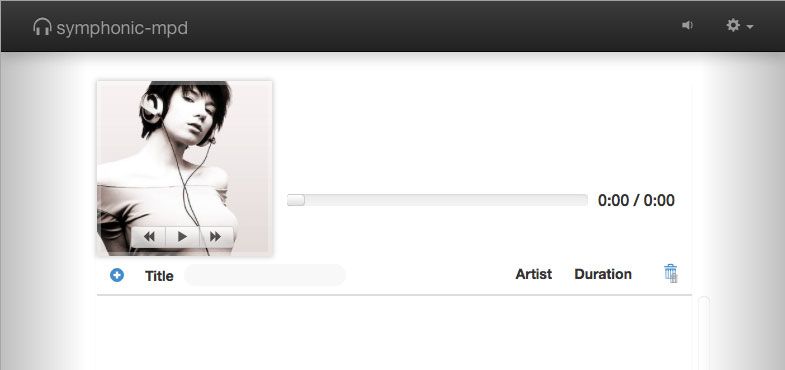
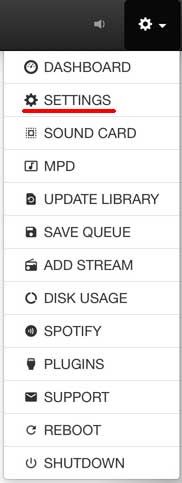
ウェブブラウザに“smpd.local” と入力し、symphonic-mpd のWebUI を表示させます。WebUI 右上の歯車アイコンをクリックしプルダウンメニューを表示させ、“SETTINGS” を選択します。
Enter “smpd.local” in the web browser to display the symphonic-mpd WebUI. Click the gear icon at the top right of the WebUI to display the pull-down menu, and select “SETTINGS” .

5.2 NAS 情報の入力
Enter NAS information
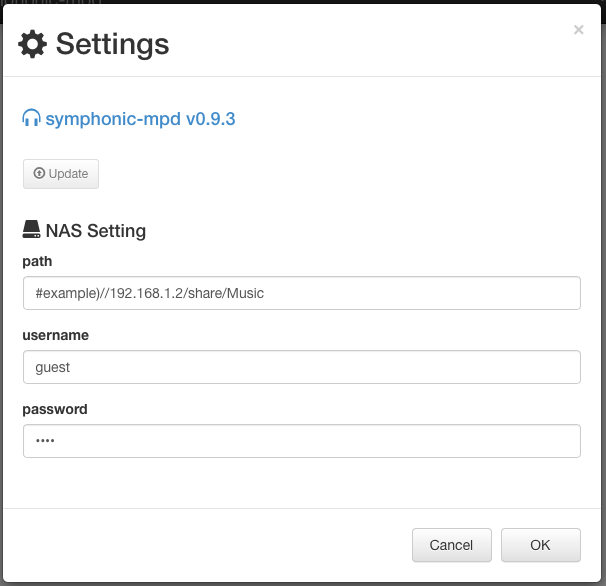
表示される“Settings”パネルの下部に“NAS Setting”があります。“path”に認識させるNAS のパスを、“username” と“password” には、NAS で設定しているユーザー名とパスワードを入力します。最後に“OK” ボタンを押します。
You can see “NAS Setting” at the bottom of the “Settings” panel. Enter the path of the NAS to be recognized in “path” , and the user name and password, which are set in the NAS, in “username” and “password” . After entering all the information, press the “OK” button.
5.3 設定の反映
Settings are reflected
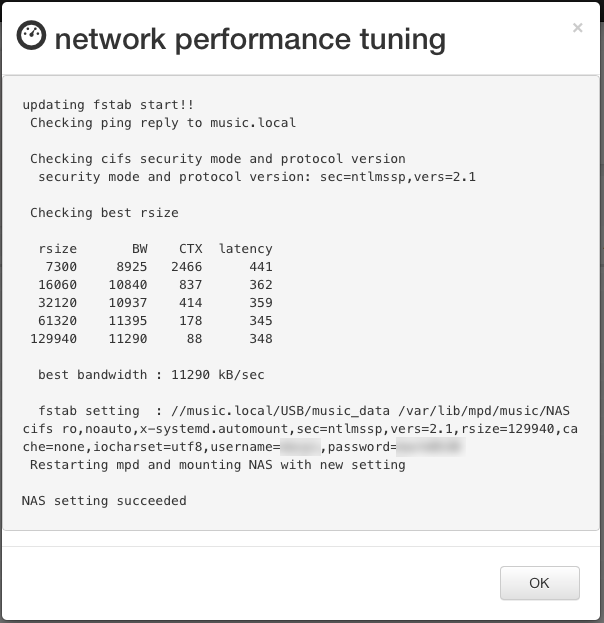
“network performance tuning” パネルが表示されます。“NAS setting succeeded” と表示されれば、設定完了です。“OK” ボタンをクリックしてください。symphonic-mpd がNAS を認識し、設定が完了するまで、約30 秒ほどかかります。
注意:NAS との接続はCIFS で行っています。NFS はサポートしておりません。
The “network performance tuning” panel is displayed. If “NAS setting succeeded” is displayed, the setting is complete. Click the “OK” button. It takes about 30 seconds for symphonic-mpd to recognize the NAS and complete the settings.
Note: Connection to the NAS is done with CIFS only. NFS is not supported.
6. サウンドカードの設定
Sound Card Setting
WebUI右上の歯車アイコンをクリックしプルダウンメニューを表示させ、“SOUND CARD”を選択します。
Click the gear icon in the upper right corner of the WebUI to display a pull-down menu, and select “SOUND CARD”.

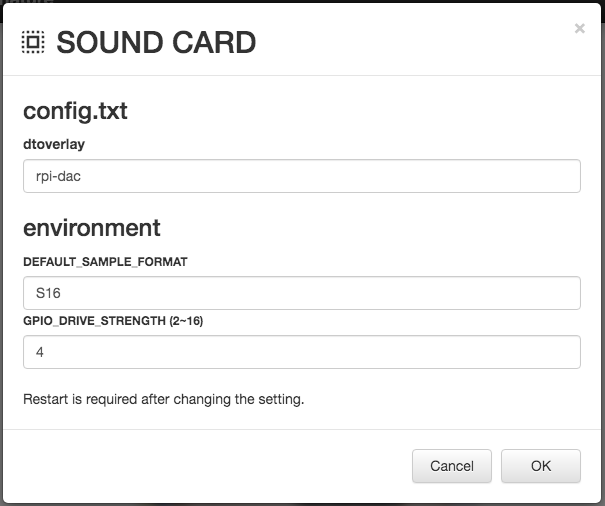
表示される「SOUND CARD」パネルのdtoverlayの欄に、使用するI2S HATカードに対応するドライバーを入力します。入力するドライバーはI2S DAC 対応表で確認してください。
Enter the driver corresponding to the I2S HAT card you use in the "dtoverlay" field of the "SOUND CARD" panel that appears. Check the driver to be input in the I2S DAC compatibility table.
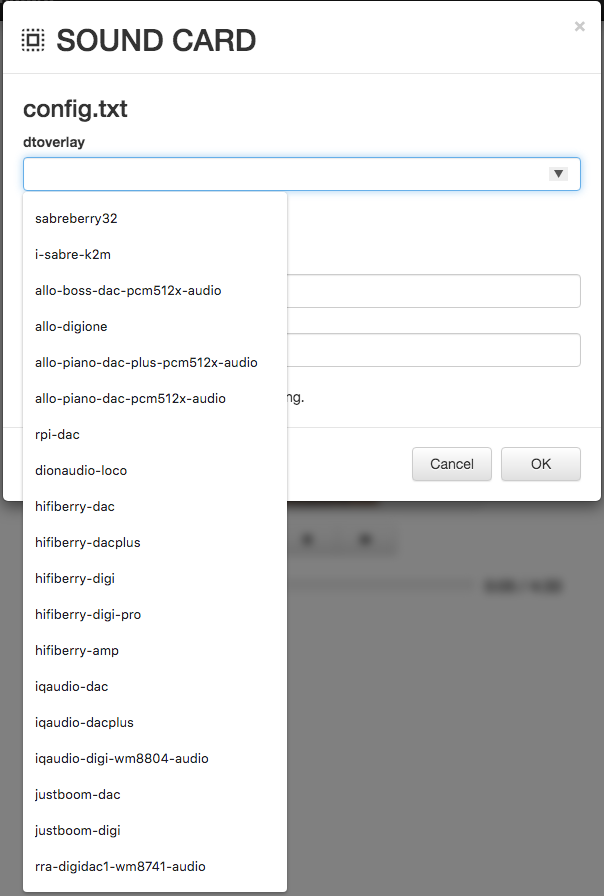
通常「environment」の入力値は、初期値のままでかまいません。SabreBerry32など、一部のI2S HATカードは、“DEFAULT_SAMPLE_FORMAT”で“S32”を選択します。
Normally, the input value of "environment" can be the default value. Some I2S HAT cards, such as SaberBerry32, select “S32” for “DEFAULT_SAMPLE_FORMAT”.
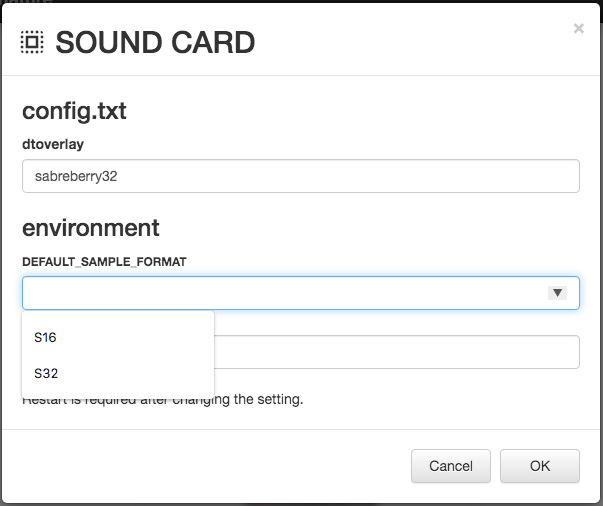
入力後、「OK」ボタンをクリックし、Raspberry Piを再起動させることで、入力内容がシステムに反映されます。この再起動時から、I2S HATカードは起動音を出力するようになります。
Some I2S HAT cards, such as SaberBerry32, also require inputs to "environment". After inputting, click the "OK" button and restart Raspberry Pi to reflect the input contents on the system. From this restart, the I2S HAT card will output the startup sound.
7. SoX Resamplerの設定
SoX Resampler Set Up
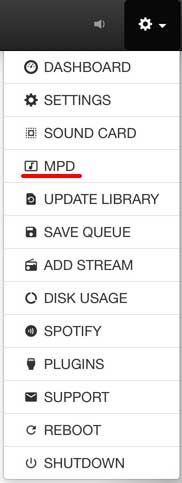
WebUI右上の歯車アイコンをクリックしプルダウンメニューを表示させ、“MPD”を選択します。
Click the gear icon in the upper right corner of the WebUI to display a pull-down menu, and select “MPD”.
7.1 samplerate_converter
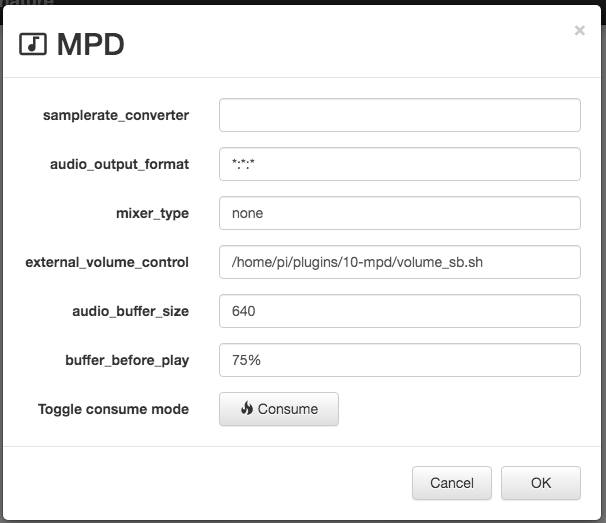
SoX Resamplerの変換品質を設定します。選択肢は、“soxr very high”、“soxr high”、“soxr medium”、“internal”の4種です。SoX Resamplerを利用しない場合は、入力欄を空白のままにするか、“internal”を選択します。
Set the conversion quality of SoX Resampler. The choices are “soxr very high”, “soxr high”, “soxr medium”, and “internal”. If you do not use SoX Resampler, leave the input field blank or select "internal".
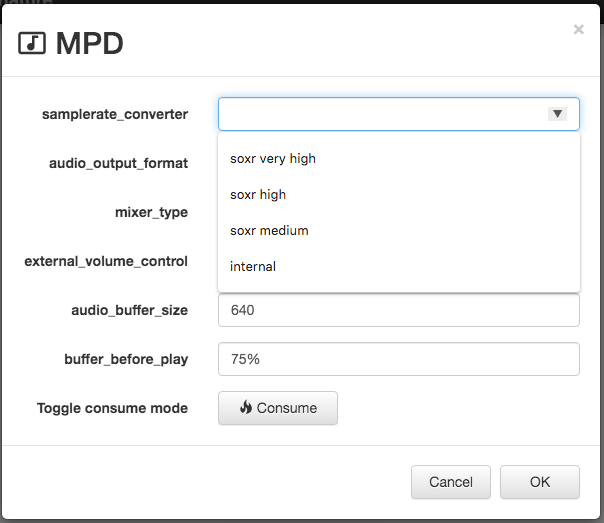
注:I2S HAT カードのサプライヤーからの指定がない限り、“samplerate converter” の入力欄は空白のままにするか、“internal” を選択することを推奨します。なぜなら、ソフトウェアでリアルタイムに処理できる程度のリサンプリング処理は、音質を悪くすることはあれ、良くすることはないからです。
Note : Unless otherwise specified by the I2S HAT card supplier, we recommend that you leave the "samplerate converter" input field blank or select "internal". The reason is that resampling processing that can be processed in real time by software does not improve the sound quality, although it may deteriorate the sound quality.
注:SabreBerry32 ユーザーは“internal” を選択してください。詳しくは「よくある質問と答え」の「SabreBerry32 をマスターモードで使用したい」を参照してください。
Note : SaberBerry32 users should select "internal" in the "samplerate converter" input field. For more information, see "I want to use SabreBerry32 in master mode" in "Frequently Asked Questions".
7.2 audio_output_format
SoX Resamplerが有効になっている場合、ここで設定したフォーマットに変換されます。入力フォーマットは「サンプリングレート」、「ビット深度」、「チャンネル数」の3つの設定値をコロンで連結した文字列となります。例えば、サンプリングレート:44.1KHz、ビット深度:32bit、ステレオの場合、入力値は44100:32:2となります。数値の代わりに*も設定できます。この*は、指定される数値が変換対象外であることを意味します。上記の例をとって「サンプリングレート」と「チャンネル数」を変換対象外に指定する場合、入力値は*:32:*となります。なおSoX Resamplerを有効にするしないにかかわらず、この項目を空欄のままで設定することはできません。SoX Resamplerを利用しない場合は、*:*:*と設定しておきましょう。
If SoX Resampler is enabled, it will be converted to the format set here. The input format is a string in which the three setting values of "sampling rate", "bit depth", and "number of channels" are concatenated with a colon. For example, if the sampling rate is 44.1KHz, the bit depth is 32bit, and the stereo, the input value is44100: 32: 2 . * can be set instead of a numerical value. This* means that the specified number is out of the conversion target. If you specify "Sampling rate" and "Number of channels" to be excluded from the conversion in the above example, the input value will be *: 32: *.
Note that this item cannot be left blank, regardless of whether SoX Resampler is enabled. If you do not use SoX Resampler, set *: *: * .
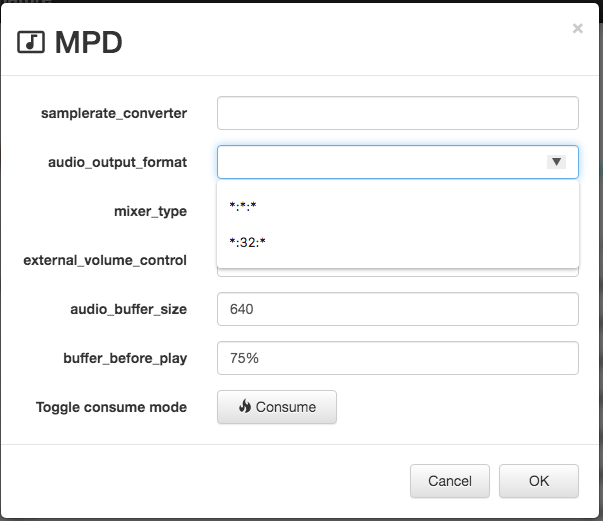
注:SabreBerry32ユーザーは *:32:* を選択してください。詳しくは「よくある質問と答え」の「SabreBerry32をマスターモードで使用したい」を参照してください。
Note : SaberBerry32 users should select *:32:* in the "audio_ouput_format" input field. For more information, see "I want to use SabreBerry32 in master mode" in "Frequently Asked Questions".
8.ボリュームの設定
Volume Set Up
8.1 mixer_type
設定値は“hardware”、“software”、“external”、“none”の4種類です。初期値は“none”で、ボリュームスライダー機能は無効になっています。
The setting values are "hardware", "software", "external", and "none". The default value is “none”, and the volume slider function is disabled.
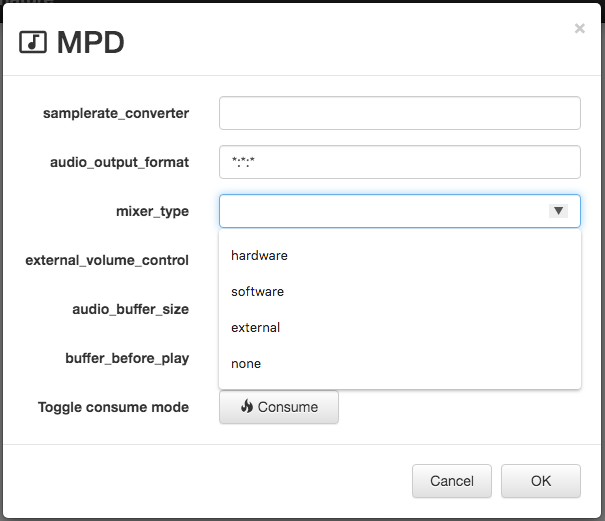
“software”を設定することで、ソフトウェアボリュームを利用できるようになります。
By setting “software”, you can use the software volume.
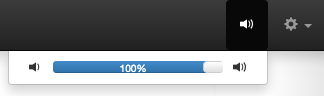
ただしソフトウェアボリュームでは、ボリュームを絞ることで再生音の品質が低下する可能性があります。
However, with software volumes, reducing the volume may reduce the quality of the playback sound.
SabreBerry32、Terra-Berry DAC2ユーザーは“external”を設定することで、ハードウェアボリュームを利用可能になります。その際、次項の“external_volume_control”で適切な設定を行ってください。
SaberBerry32 and Terra-Berry DAC2 users can use the hardware volume by setting “external”. At that time, make appropriate settings in “external_volume_control” in the next section.
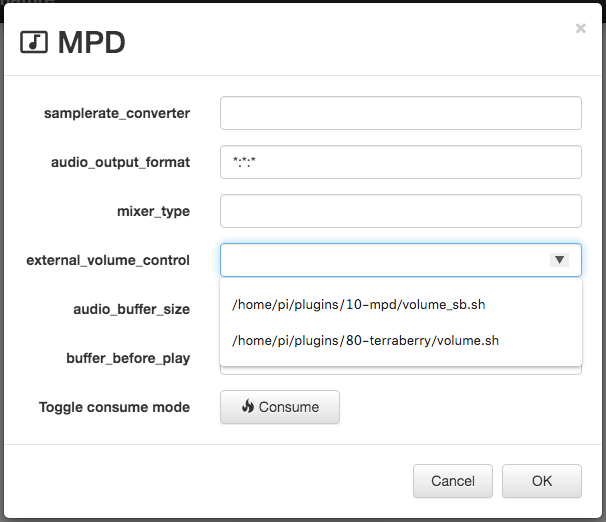
8.2 external_volume_control
ボリューム操作用のシェルのパスを指定します。“mixer_type”に“external”が指定されているときだけ本設定が使われます。SabreBerry32用のシェルとTerra-Berry DAC2向けのシェルのパスの2種類から選択可能です。
Specify the path of shell for volume operations. This setting is used only when “external” is specified for “mixer_type”. You can select from two types of paths for SabreBerry32 and Terra-Berry DAC2.
9. その他の設定
Other Settings
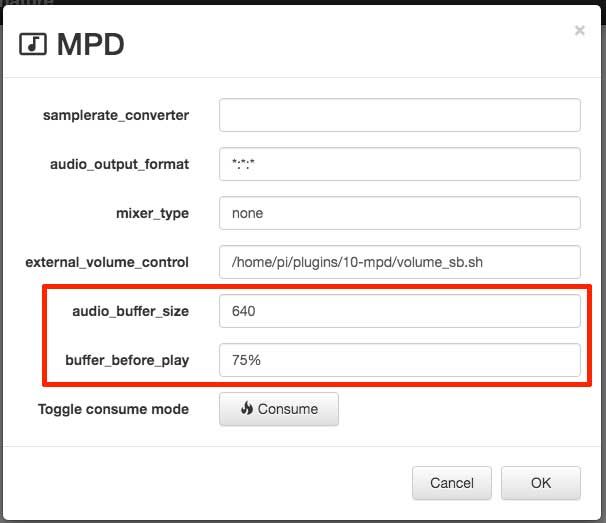
9.1 audio_buffer_size
初期値のまま使用して問題はありません。
ネットワークの品質に問題がある環境では、バッファサイズを大きくすると再生が安定する可能性があります。ただし、バッファを大きくすると音質は悪化しやすくなります。L2キャッシュを圧迫しないよう、慎重に引き上げるべきです。
There is no problem using the default value.
In environments where there is a problem with network quality, increasing the buffer size may result in stable playback. However, increasing the buffer size increases the likelihood that the quality of the playback sound will deteriorate. You should raise it carefully to avoid squeezing L2 cache of Raspberry Pi.
9.1 buffer_before_play
“audio_buffer_size”と同様です。
初期値のまま使用して問題はありません。
Same as “audio_buffer_size”.
There is no problem using the default value.
10. 楽曲データベースの構築
Recognize songs on NAS
WebUI 右上の歯車アイコンをクリックしプルダウンメニューを表示させ、“UPDATE LIBRARY” を選択します。
Click the gear icon in the upper right corner of the WebUI to display a pull-down menu, and select “UPDATE LIBRARY” .
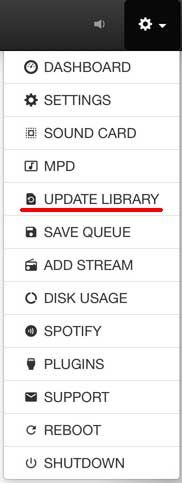
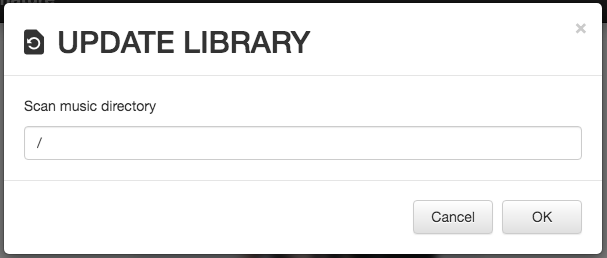
UPDATE LIBRARY選択後に表示される「UPDATE LIBRARY」パネルではテキストボックスに「/」が表示されていますが、そのままOKを押して下さい。その後、ダイアログは消えますが「Library Update Started」という緑色のメッセージが画面左下に表示されたらデータベースの構築をバックグラウンドで実施しています。
*データベースの構築にはある程度の時間がかかります。
In the "UPDATE LIBRARY" panel that appears after selecting "UPDATE LIBRARY" from the pull-down menu, "/" is displayed in the text box, but you can simply press the "OK" button. After that, the dialog disappears, but when the green message "Library Update Started" is displayed at the bottom left of the screen, the database is being built in the background.
Note : It takes some time to build the database.